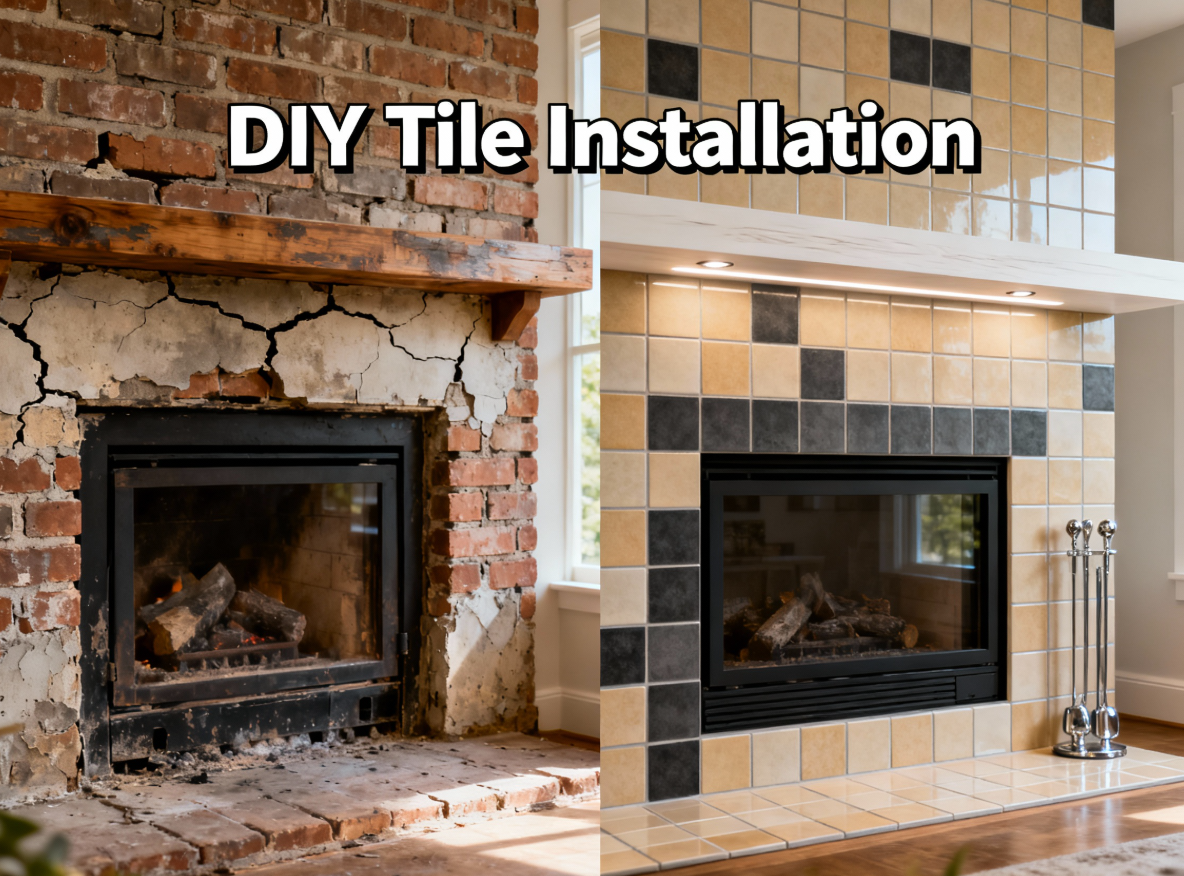
Your fireplace is the architectural heart of your living room, yet many homes are saddled with bulky, dark, or simply dated brick and brass surrounds. If your unit is an eyesore rather than a cozy centerpiece, it’s time to start Transforming Your Outdated Fireplace. This project does not require expensive demolition; often, the highest impact changes involve simple DIY techniques like painting the brick, adding shiplap to the tablecloth, or applying a modern tile overlay. We cover the most effective, budget-friendly strategies to update your hearth and give your entire room a dramatic, contemporary refresh.
If your fireplace feels outdated, a simple DIY tile project can transform it into a stunning focal point. Start by evaluating its current style and condition, then choose tiles that match your taste. With the right materials and a bit of planning, you’ll be on your way to a fresh look. Want to know how to tackle each step for a seamless installation? Let’s explore the process together.
Assessing Your Current Fireplace
Before diving into your fireplace transformation, it’s essential to assess your current setup.
Take a good look at your fireplace style and how it fits into your living space. Is it outdated, or does it still have charm? Make notes on its condition—cracks, discoloration, or wear can affect functionality.
Consider how you use the fireplace: does it serve as a cozy gathering spot, or is it just decorative? A functionality assessment will help you determine what changes you need.
Take photos from different angles to visualize potential updates. This step not only informs your design choices but also connects you to your home’s story.
Embrace this process; your fireplace has the power to bring warmth and connection to your space.
Choosing the Right Tile
When you’re ready to elevate your fireplace, choosing the right tile can make all the difference.
Start by reflecting on tile materials—ceramic, porcelain, or natural stone each offer unique styles and durability. Think about how these materials fit into your home’s aesthetic.
Next, let’s talk color combinations. You might want earthy tones for a cozy feel or bold colors to create a statement. Picture how those colors will harmonize with your living space; it’s about creating a welcoming vibe.
Don’t forget to contemplate the size and shape of the tiles, too. Larger tiles can make a small space feel grand, while smaller tiles can add intricate detail.
Trust your instincts, and choose what resonates with your personal style!
Preparing Your Workspace
Now that you’ve chosen the perfect tile for your fireplace, it’s time to focus on your workspace. Start by clearing the area around your fireplace. A clean, organized workspace makes all the difference!
Lay down a drop cloth to protect your flooring from dust and debris. Gather your tools and materials, keeping them within arm’s reach for easy access.
Don’t forget about safety precautions! Wear gloves and goggles to protect yourself from sharp edges and dust. If you’re using a power tool, guarantee you have adequate lighting, so you can see what you’re doing.
An organized space not only enhances efficiency but also makes the whole process more enjoyable. Get ready to transform that fireplace into the centerpiece it deserves to be!
Gathering Your Materials
Gathering your materials is an essential step in your fireplace transformation. First, decide on the tile types you want—ceramic, porcelain, or glass can each bring a unique flair. Picture how they’ll complement your living space!
Next, head to reliable material sources like local home improvement stores or online retailers. Don’t forget to grab adhesive, grout, and any necessary tools, like a tile cutter or spacers. If you’re unsure, many stores offer samples, which can help you visualize your design before committing.
It’s all about creating a space that feels like home, so take your time selecting pieces that resonate with your style. With everything ready, you’ll feel excited to plunge into your DIY project!
Removing Old Surrounds
Removing old surrounds is an essential step in your fireplace transformation, and it can be a bit of a workout!
First, assess the surround materials—whether they’re brick, wood, or tile. Depending on what you find, you’ll need different removal techniques. For tile, a chisel and hammer work wonders; just be careful not to damage the underlying surface.
If you’re dealing with wood, a pry bar can help you carefully lift the boards away. Always wear safety goggles and gloves to protect yourself.
As you peel away the old layers, visualize your new design taking shape. It’s a rewarding process, and soon, you’ll be ready to create a cozy centerpiece that truly reflects your style!
Cleaning and Repairing the Surface
After stripping away the old surrounds, you’ll want to focus on cleaning and repairing the surface to confirm a smooth foundation for your new design.
Start with some effective cleaning techniques—use a mixture of warm water and mild soap to scrub away any grime. A stiff brush can help tackle stubborn spots.
Once it’s clean, inspect the surface for any cracks or chips. For surface repairs, fill these imperfections with a patching compound, smoothing it out for an even finish.
Don’t forget to let it dry completely before moving on to tile placement. A well-prepped surface not only enhances the look but also confirms your new tiles adhere properly, making your fireplace a cozy focal point in your home.
Measuring and Planning Your Tile Layout
Before you plunge into tile placement, it’s essential to measure and plan your layout carefully—this step can make or break your fireplace transformation.
Start by determining your tile dimensions. Measure the area you want to cover, noting any obstacles like mantels or built-ins.
Next, visualize your layout patterns. Do you want a classic grid, a herringbone, or something more unique? Lay the tiles out on the floor first to see how they interact with your space. This helps you catch any potential issues before committing.
Take your time here; a well-planned layout not only looks great but also makes installation smoother. You’re creating a cozy spot that reflects your style, so make it count!
Applying Tile Adhesive
Now that you’ve got your tile layout planned, it’s time to choose the right adhesive for your project.
You’ll want something that bonds well and can handle the heat, so check the labels carefully.
When applying the adhesive, spread it evenly with a notched trowel to guarantee your tiles stick perfectly.
Choosing the Right Adhesive
Choosing the right adhesive for your tile is essential to guarantee a lasting, beautiful finish on your fireplace transformation.
You’ll encounter various tile adhesive types, like thin-set mortar or mastic, so consider your tile’s surface compatibility. For instance, if you’re tiling a non-porous surface, mastic might be your best bet. On the other hand, thin-set works well for more porous materials.
Don’t forget to read the manufacturer’s recommendations to ascertain you’re picking the right adhesive for your specific tiles and fireplace material.
It’s all about creating a solid bond that stands the test of time. So, gather your supplies, choose wisely, and get ready to transform your space into a cozy gathering spot for friends and family!
Applying Adhesive Evenly
With the right adhesive in hand, you’re ready to start applying it to your fireplace.
First, choose the adhesive type that suits your tiles—thin-set mortar for heavier tiles or adhesive mastic for lighter ones.
Use a notched trowel to spread the adhesive evenly across the surface. Hold the trowel at a 45-degree angle for those perfect ridges that help create a strong bond.
Don’t rush; work in small sections so the adhesive doesn’t dry out before you place your tiles.
Remember, less is more—too much adhesive can lead to uneven tiles.
Follow these application tips, and you’ll create a beautiful, cohesive look that makes your fireplace the heart of your home!
Installing the Tiles
As you plunge into the exciting process of installing the tiles, keep in mind that preparation is key to achieving a polished look.
Start by laying out your tiles in the desired pattern, following current fireplace design trends. This visual guide helps you see how they’ll fit together before you begin.
Using effective tile installation techniques, apply each tile firmly, ensuring even spacing. Don’t be afraid to adjust as you go; it’s all part of the creative process!
If you’re using different sizes or colors, take your time to create a balanced appearance.
Grouting the Tiles
Once your tiles are securely in place, grouting is the next step that brings everything together. Choose the right grout type—either sanded for wider joints or unsanded for thinner ones.
Grab a grout float and scoop some grout onto it, spreading it diagonally over the tiles to fill the gaps. Don’t worry about getting it perfect; you’re just aiming to fill those spaces!
Now, let’s talk grout colors. This is where you can really personalize your fireplace. A light grout can create a clean, modern look, while a darker shade can add depth and warmth.
Once you’ve filled the joints, wipe off any excess with a damp sponge. You’re one step closer to enjoying your stunning new fireplace!
Sealing and Finishing Touches
Now that you’ve grouted your tiles, it’s time to seal the deal!
Choosing the right sealant will protect your hard work, while proper application techniques guarantee it lasts.
Don’t forget those final touches that’ll make your fireplace pop and truly reflect your style!
Choosing the Right Sealant
How can you guarantee your DIY fireplace transformation stands the test of time? Choosing the right sealant is key.
Look for sealant types that suit your tile material—silicone, epoxy, or acrylic are popular choices. Each type offers unique benefits, so consider the look and durability you want. For instance, silicone provides flexibility and water resistance, while epoxy is incredibly tough and ideal for high-traffic areas.
When it comes to application methods, make certain you follow the manufacturer’s instructions for the best results.
Whether using a caulking gun or a brush, a clean, even layer will help protect your beautiful work. By taking these steps, you’ll not only enhance the look of your fireplace but also make sure it remains a cherished gathering spot for years to come.
Application Techniques for Durability
While you might be enthusiastic to show off your newly transformed fireplace, taking the time to master application techniques can make all the difference in its longevity.
Start by applying your chosen sealant evenly, focusing on the grout lines and edges. This guarantees maximum protection against moisture and wear, two key durability factors.
Don’t rush; allow each coat to dry fully before applying another. After sealing, perform regular tile maintenance by cleaning gently with non-abrasive materials to avoid damaging your new surface.
A little care goes a long way in maintaining that fresh look and extending the life of your beautiful tile.
Final Touches for Aesthetics
With your fireplace sealed and protected, it’s time to turn your attention to the finishing touches that will elevate its aesthetic appeal.
Start by adding decorative accents that reflect your style—think candle holders, art pieces, or even a cozy throw draped nearby. For color coordination, choose items that complement your tile tones; this creates a cohesive look that feels inviting and harmonious.
Consider incorporating greenery, like potted plants or flowers, to breathe life into the space.
Finally, don’t forget about the lighting—soft, warm lights can highlight your fireplace’s beauty and create a welcoming atmosphere.
These thoughtful details won’t only enhance your fireplace but also foster a sense of belonging in your home.
Styling Your Updated Fireplace
Your updated fireplace is the perfect canvas for showcasing your personal style, and it’s time to make it shine.
Start by choosing a color scheme that complements your room—think warm earth tones or cool blues.
Layer your fireplace decor with a mix of textures; try candles, framed art, or even a stylish clock to create visual interest.
Don’t forget to incorporate greenery—plants can add a fresh touch and warmth to your space.
Arrange your decor thoughtfully, ensuring it feels balanced and inviting.
Consider adding a cozy throw or decorative basket nearby to enhance that sense of belonging.
With these tips, your fireplace won’t only be a focal point but also a reflection of your unique style.