Categories
Uncategorized

The Benefits of Installing Wood Floor Grates

Many homeowners overlook the advantages of installing wood floor grates, yet they can significantly enhance your living space. These grates provide effective ventilation, helping to regulate temperature and moisture control in your home. Additionally, wood floor grates seamlessly blend with your decor, adding a touch of elegance while improving air circulation. By investing in quality wood grates, you can also prolong the lifespan of your flooring, ensuring a comfortable environment year-round.

Benefits of Wood Floor Grates

By installing wood floor grates, you unlock numerous advantages that enhance both functionality and style in your home. These grates facilitate better airflow and improve heating efficiency, ensuring a cozy environment, especially during colder months. Furthermore, they add a unique design touch, blending seamlessly with various interior styles, making it an investment that pays dividends in comfort and aesthetics.

Improved Air Circulation

Wood floor grates enhance air circulation by allowing heated or cooled air to flow freely through your living spaces. This improved airflow results in a more consistent temperature throughout your home, minimizing hot or cold spots. In homes with central heating and cooling systems, these grates ensure that air reaches all corners effectively, leading to energy efficiency and comfort.

Enhanced Aesthetic Appeal

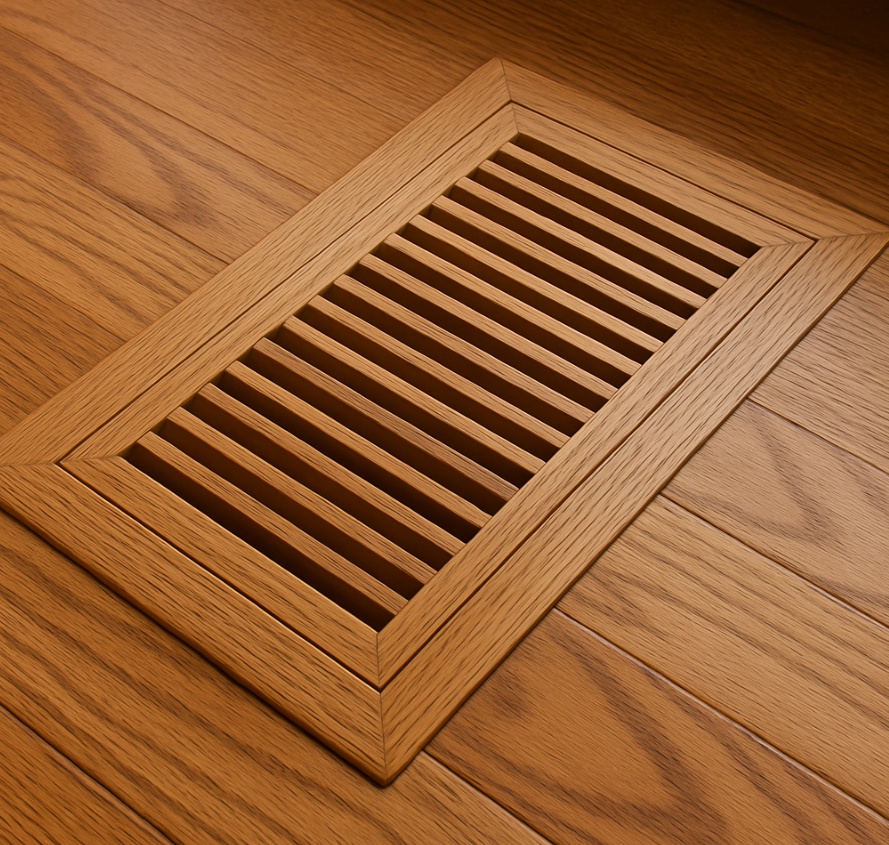
The aesthetics of your space can be significantly elevated with the addition of wood floor grates. They provide a warm, inviting look that complements hardwood floors, allowing for a cohesive design. Available in various styles and wood types, you can choose grates that match your interior decor, adding texture and character to rooms. Their elegant design can turn a functional feature into a visually appealing element.

Choosing the right wood floor grate not only harmonizes with your flooring but also serves as a design focal point. For instance, intricate patterns or custom finishes can enhance traditional spaces, while sleek, minimalist grates can suit modern designs. High-quality wood grates not only boost visibility but also reflect your personal style, making each room feel more intentional and curated. You improve your home’s design without sacrificing practicality, creating a stunning balance between form and function.

Durability and Longevity

Wood floor grates provide exceptional durability and longevity, making them a wise investment for your home. Unlike other materials, quality wood can withstand heavy foot traffic and resist wear over time. When properly installed and cared for, these grates have an impressive lifespan, retaining their aesthetic appeal and functionality for decades.

Material Quality

Choosing high-quality wood species, such as oak or maple, greatly impacts the longevity of your floor grates. These hardwoods are naturally resistant to dents and scratches, ensuring they maintain their beauty even in high-traffic areas. Solid construction coupled with premium finishes helps to enhance durability, making them a reliable choice for your flooring needs.

Maintenance Requirements

Your wood floor grates do require some maintenance to keep them looking their best. Regular cleaning, such as sweeping or vacuuming, removes dirt and debris that can cause scratches. Additionally, applying a protective finish every few years will preserve the wood’s integrity and luster, while ensuring longevity.

Proper maintenance involves not only routine cleaning but also scheduled inspections for signs of wear or damage. Addressing minor issues, like tightening loose boards or reapplying finish, can prevent larger problems down the line. Consider using a gentle cleaner specifically designed for wood, and avoid excessive moisture to maintain the quality of your floor grates. This proactive approach ensures they remain a beautiful feature in your space for many years.

Environmental Considerations

When considering your home’s impact on the environment, wood floor grates offer several advantages that align with eco-conscious practices. Sourced from renewable forests, they help reduce the carbon footprint associated with flooring materials. Plus, sustainable management practices ensure that your choice supports biodiversity and forest health, making it a responsible option for environmentally aware homeowners.

Sustainability of Wood

Opting for wood grates means choosing a sustainable material that, when responsibly sourced, contributes positively to the environment. Wood is biodegradable and can be sustainably harvested, making it a preferable choice compared to synthetic flooring options. By selecting wood grates certified by organizations like the Forest Stewardship Council (FSC), you can ensure that your choice reflects environmentally sound practices.

Energy Efficiency

Your home’s energy efficiency can significantly benefit from installing wood floor grates. They facilitate better air circulation compared to other materials, helping to regulate indoor temperature and reduce energy usage for heating and cooling. Improved airflow can lead to lower utility bills, making wood grates a smart choice for both comfort and cost savings.

By enhancing air circulation, wood floor grates assist in minimizing the reliance on heating and cooling systems. This improvement can lead to energy savings of up to 20% annually, depending on your home’s layout and existing systems. Additionally, maintaining a consistent indoor temperature reduces wear on HVAC systems, extending their lifespan and further decreasing energy costs. The integration of wood grates not only contributes to a more comfortable living environment but also represents a sustainable approach to home design that prioritizes efficiency and environmental health.

Installation Process

Installing wood floor grates involves careful planning and precise execution to ensure optimal airflow and aesthetics. Begin by assessing the areas where you intend to install the grates, ensuring compatibility with your existing flooring. Proper installation not only enhances functionality but also contributes to the overall appearance of your space.

Tools and Materials Needed

You’ll need specific tools and materials to facilitate a smooth installation. Gather necessary items such as a measuring tape, utility knife, wood glue, wood floor grates, and finish nails. Having the right tools on hand saves time and helps achieve a professional result.

Step-by-Step Guide

The installation of wood floor grates can be broken down into several clear steps that will help you achieve a seamless finish. Begin by measuring the space where you will install the grate, cut the opening as required, and ensure a snug fit. Next, secure the grate with wood glue and finish nails.

Step-by-Step Guide

Step Description
1. Measure Accurately measure the area for the grate installation.
2. Cut Opening Carefully cut the opening in the flooring to fit the grate.
3. Fit Grate Place the wood floor grate in the cut-out area to ensure a snug fit.
4. Secure Use wood glue and finish nails to fasten the grate in place.

Each step in the process requires attention to detail for success. After cutting the flooring, it’s important to sand the edges for a smooth finish. When securing the grate, ensure it sits level with the surrounding floor to avoid tripping hazards. Lastly, cleanup any excess glue for a polished appearance and consistent airflow throughout your space.

Additional Step-by-Step Guidelines

Step Note
5. Finish Edges Smooth any rough edges with sandpaper for safety and aesthetics.
6. Final Check Inspect the installation to ensure stability and a seamless fit.

Cost Considerations

Initial Investment

When evaluating wood floor grates, consider the initial investment, which can vary based on material quality and design complexity. High-quality wood options may range from $15 to $40 per square foot, affecting your budget significantly. It’s wise to factor in installation costs, as professional installation can add an additional $5 to $15 per square foot. Careful planning of your project can help you allocate funds effectively.

Long-Term Value

Investing in wood floor grates offers substantial long-term value. Not only do they enhance the aesthetic appeal of your space, but their durability also contributes to increasing your property’s overall value. Homebuyers often prefer features that improve air circulation and contribute to efficient heating and cooling. This means you can see a solid return on your investment when it’s time to sell.

Additionally, wood floor grates can improve the efficiency of your HVAC system by promoting better airflow, which may lead to reduced energy bills over time. On average, homeowners experience a 10-20% decrease in utility costs with effective ventilation solutions like these. By selecting wood floor grates, you’re not just opting for enhanced visual appeal; you’re making a choice that pays off in both comfort and savings in the years to come.

Common Misconceptions

Misconceptions surrounding wood floor grates can deter many from considering them for their spaces. Often, people believe that these grates are too fragile, aesthetically unpleasing, or unsuitable for modern homes. However, these assumptions fail to recognize the advancements in design and durability that make wood floor grates a valuable addition to any environment.

Myths About Wood Floor Grates

You might think wood floor grates are noisy or prone to wear and tear, creating an inconvenient experience. However, many modern designs incorporate noise-dampening features and are crafted from high-quality materials designed for longevity. This challenges the stereotype that they won’t stand the test of time.

Clarifying Misunderstandings

Another common misunderstanding is that wood floor grates require excessive maintenance. In reality, they often need the same care as your regular flooring. A simple cleaning routine and occasional refinishing can keep them looking and functioning beautifully over time, proving to be more practical than many assume.

To clarify further, the maintenance of wood floor grates is often comparable to caring for hardwood flooring, which typically involves sweeping, vacuuming, and periodic polishing. Many wood floor grates are finished with protective coatings that enhance their durability and resistance to moisture. This means that regular upkeep can be minimal, allowing you to enjoy the aesthetic benefits without the burden of excessive maintenance. With a smart choice of wood and finishes, these grates can endure heavy foot traffic just like any other flooring option, making them a viable choice for both residential and commercial settings.

Final Words

Considering all points, installing wood floor grates can significantly enhance your home’s aesthetic while improving air circulation and reducing energy costs. You benefit from increased durability and style, as these grates blend seamlessly with various interior designs. Their ability to mask unsightly vent openings creates a polished look in your space, ensuring that you enjoy both functionality and beauty. Investing in wood floor grates not only elevates your home’s appearance but also contributes to a more comfortable living environment, making it a worthwhile addition for any homeowner.

Categories
Uncategorized

Simple Door Hardware Upgrade: How to Replace a Doorknob in 5 Steps

An old, sticky, or brassy doorknob can instantly date a room and even make accessing a space frustrating. Fortunately, learning How to Replace a Doorknob is one of the easiest, fastest, and most satisfying DIY projects you can complete. Whether you are swapping a basic passage handle for a privacy lock or simply refreshing outdated hardware for a modern look, this task requires nothing more than a few basic tools and about 15 minutes of your time. If you can handle a screwdriver, you can tackle this project. Follow our simple, step-by-step instructions to achieve a beautiful, functional update today!

Upgrading your doorknob can dramatically improve your space’s look and feel without breaking the bank. This simple DIY project requires just a few tools and a bit of your time. By following five straightforward steps, you can achieve a polished and functional result that elevates your home’s entrance. Ready to tackle this easy upgrade? Let’s explore how to get started.

Gather Your Tools and Materials

Before you plunge into replacing your doorknob, it’s essential to gather the right tools and materials.

Start with your tool selection: you’ll need a screwdriver, a new doorknob, and possibly a drill. A flathead and Phillips screwdriver will cover most types of doorknobs.

Next, consider material types. Choose a doorknob that matches your style, whether it’s brass, stainless steel, or a more modern finish. If you’re looking for durability, opt for metal over plastic.

Having the right tools and materials won’t only streamline the process but also guarantee your new doorknob enhances the look and feel of your space.

With everything ready, you’ll feel confident in your ability to complete this upgrade successfully.

Remove the Old Doorknob

With your tools and materials at the ready, it’s time to remove the old doorknob.

Start by identifying the knob type—either a passage, privacy, or dummy knob. Most have visible screws on the side or back. Use a screwdriver to unscrew these, employing appropriate removal techniques.

If you can’t see screws, look for a small pinhole; this often hides a release mechanism. Insert a paperclip or similar tool to push the pin and release the knob.

Once you’ve removed the knob, take off the faceplate and latch mechanism by unscrewing them as well. This step is essential for a smooth installation of your new doorknob, ensuring everything aligns perfectly for your door.

Install the New Doorknob

Now it’s time to install your new doorknob. First, align the doorknob components with the holes in the door. Depending on the doorknob styles you’ve chosen, you may need specific installation techniques.

Insert the spindle through the latch and attach the exterior knob, ensuring it fits snugly. Next, secure the interior knob, aligning it with the spindle and tightening any screws. Be careful not to overtighten, as this can damage the doorknob.

If your knob has a locking mechanism, make sure it’s positioned correctly. Finally, check that everything feels secure and functions smoothly.

With your new doorknob in place, you’ll enjoy a refreshed look that enhances your home’s style and functionality.

Test the Functionality

After securing your new doorknob, it’s time to test the functionality to confirm everything works as it should.

Start by turning the doorknob to guarantee it rotates smoothly without any resistance. Next, check the doorknob alignment by closing the door and observing if it latches correctly. If it doesn’t catch, you might need to adjust the strike plate or the doorknob itself.

Give the knob a gentle push to see if it locks and releases easily. Pay attention to any unusual sounds; these could indicate misalignment.

Finally, verify the door opens and closes without sticking. Effective functionality testing will help you enjoy your upgraded doorknob, making your space feel more welcoming and secure.

Final Touches and Cleanup

Once you’ve confirmed your new doorknob functions properly, it’s time to focus on the final touches and cleanup.

Start with a final inspection to guarantee everything is secure; check screws and alignment one last time.

If you’ve got any decorative accents, like a matching plate or trim, now’s the moment to install those for a polished look.

Wipe down the area around the doorknob to remove fingerprints or dust, guaranteeing it looks as good as it works.

Don’t forget to dispose of any packaging and old hardware responsibly.

With these steps, you’ll not only enjoy a functional door but also create an inviting atmosphere that reflects your personal style and care for your space.

Categories
Uncategorized

5 DIY Projects That Add the Most Resale Value to Your Home


We’ve zeroed in on the 5 DIY Projects That Add the Most Resale Value to Your Home, concentrating on simple, achievable tasks that appeal directly to modern buyers. From enhancing curb appeal to updating kitchens, these projects prove you don’t need a contractor to make a significant financial impact on your property’s worth.

Not all home improvements are created equal—especially when it comes to selling your property. If you’re looking to boost your asking price without breaking the bank on a professional renovation, you need to focus on key areas that offer the highest return on investment (ROI).

If you want to boost your home’s resale value, start with landscaping to enhance curb appeal. Upgrade your kitchen with modern fixtures, and paint the bathroom for a fresh look. Create an inviting outdoor space by adding comfortable seating and greenery. Finally, installing energy-efficient features can greatly lower utility costs and attract buyers. Follow these tips, and you’ll see how simple changes can make a big impact on your home’s value. There’s much more to explore!

Revamp Your Curb Appeal With Landscaping

When you want to boost your home’s resale value, revamping your curb appeal with landscaping is a smart move.

Start by trimming overgrown bushes and trees to create a clean, inviting look. Add colorful flowers or low-maintenance plants to enhance visual interest. Consider installing a fresh layer of mulch for a polished finish.

Don’t forget about your lawn—regular mowing and fertilizing can make a huge difference. You might even create defined garden beds or pathways to guide visitors.

Upgrade Your Kitchen With New Fixtures

Upgrading your kitchen with new fixtures can dramatically enhance both its functionality and aesthetic appeal.

Start with modern faucets that not only look great but also improve water efficiency. Consider adding stylish cabinet hardware to refresh your cabinets without a full remodel.

Pendant lights over the island can create a focal point and improve lighting. Don’t forget about your sink; a deep, stainless-steel model adds both utility and style.

Finally, choose a backsplash that complements your new fixtures, tying the whole look together. These small updates can greatly boost your home’s resale value while making your kitchen a more pleasant space.

Enhance Your Bathroom With a Fresh Coat of Paint

After enhancing your kitchen with modern fixtures, it’s time to turn your attention to the bathroom.

fresh coat of paint can make a significant difference without breaking the bank. Choose light, neutral colors to create a spacious feel or soft pastels for a calming atmosphere.

Don’t forget to prep the surfaces by cleaning and priming them for better adhesion. Use mold-resistant paint for durability, especially in humid environments.

This simple update not only revitalizes the space but also appeals to potential buyers, making your home more attractive and increasing its resale value.

Grab your brush and get started!

Create an Inviting Outdoor Space

While you may focus on the interior of your home, don’t overlook the potential of your outdoor space to boost resale value.

Start by adding comfortable seating, like a patio set or a hammock, to create a cozy atmosphere. Incorporate greenery with potted plants or a small garden, enhancing visual appeal.

Consider installing a fire pit for evening gatherings, making it inviting year-round. A well-defined pathway leading to your outdoor area can also improve functionality.

With minimal investment, you can transform your backyard into an appealing oasis, making it a standout feature for potential buyers.

Install Energy-Efficient Features

As you look to enhance your home’s value, installing energy-efficient features can be a game-changer.

Begin with upgrading to Energy Star-rated appliances, which not only save energy but also appeal to eco-conscious buyers. Consider adding programmable thermostats, which help regulate heating and cooling costs.

Replacing old windows with double or triple-pane glass can greatly improve insulation. Don’t forget about solar panels; they can drastically reduce electricity bills and attract buyers looking for sustainability.

Finally, enhancing insulation in your attic or walls can make your home more comfortable and energy-efficient. These updates can lead to a higher resale value in today’s market.

Frequently Asked Questions

Which DIY Projects Are Most Cost-Effective for Resale Value?

You’ll find that updating kitchens and bathrooms, adding curb appeal with landscaping, and freshening up paint are some of the most cost-effective DIY projects.

They greatly boost your home’s appeal and resale value without breaking the bank.

How Much Value Does a New Roof Add to My Home?

A new roof can add significant value to your home, often recouping about 60-70% of its cost.

Besides, it enhances curb appeal and attracts buyers, making it a smart investment for resale purposes.

Are There Any DIY Projects to Avoid for Resale?

You should avoid overly personalized renovations, like unique wallpaper or extravagant landscaping.

These can deter potential buyers.

Instead, focus on neutral updates that appeal to a wider audience, ensuring your home remains market-friendly.

What Is the Average ROI for Kitchen Renovations?

The average ROI for kitchen renovations hovers around 60-80%.

You’ll see better returns by focusing on modern updates and practical layouts.

Just remember, quality materials and craftsmanship can greatly boost your investment’s value.

Can DIY Projects Actually Decrease My Home’s Value?

Yes, DIY projects can decrease your home’s value if they’re poorly executed or don’t align with neighborhood standards.

Buyers might view shoddy work as a red flag, leading to lower offers or longer sell times.

Conclusion

Mastering these 5 DIY Projects That Add the Most Resale Value to Your Home gives you a major advantage in a competitive market. By focusing your limited time and budget on high-impact areas like curb appeal, updated kitchens, minor bathroom facelifts, and smart, energy-efficient fixes, you appeal to buyers’ desire for move-in readiness and low future costs. Remember, buyers often pay a premium for properties they perceive as requiring zero immediate work. Choose one of these projects this weekend, and start building equity and appeal today!

By tackling these DIY projects, you can significantly boost your home’s resale value. Revamping your curb appealupgrading your kitchen, refreshing your bathroom, creating a welcoming outdoor space, and adding energy-efficient features are all great ways to make a lasting impression on potential buyers. Not only will these improvements enhance your living experience, but they’ll also pay off when it’s time to sell. So, grab your tools and get started on these rewarding upgrades today!