Categories
Uncategorized

7 Genius Storage Solutions for Small Bathrooms


7 Genius Storage Solutions for Small Bathrooms (No Major Renovation Required)

Maximize every inch! Explore clever and stylish Storage Solutions for Small Bathrooms, including floating shelves, vertical cabinets, and over-the-toilet space savers.

Small bathrooms are notorious for clutter, leaving homeowners searching for creative ways to fit essentials like towels, toiletries, and cleaning supplies into minimal square footage. If you’re tired of tripping over products, you need smart Storage Solutions for Small Bathrooms that utilize underappreciated vertical and recessed spaces. Fortunately, modern design offers dozens of budget-friendly and stylish fixes that can completely transform your tiny water closet into a highly organized and serene sanctuary. We guide you through the best methods to declutter and maximize every forgotten corner, from the wall above the toilet to the inside of your cabinet doors.

To maximize storage in your small bathroom without major renovations, start by utilizing vertical space with shelves. Invest in over-the-door organizers for easy access to essentials. Opt for multi-functional furniture that serves more than one purpose. Create hidden storage using decorative baskets to keep items out of sight. Use magnetic strips for small tools and hang hooks for towels. Finally, incorporate a rolling cart for flexible storage solutions. Keep exploring to discover even more smart ideas!

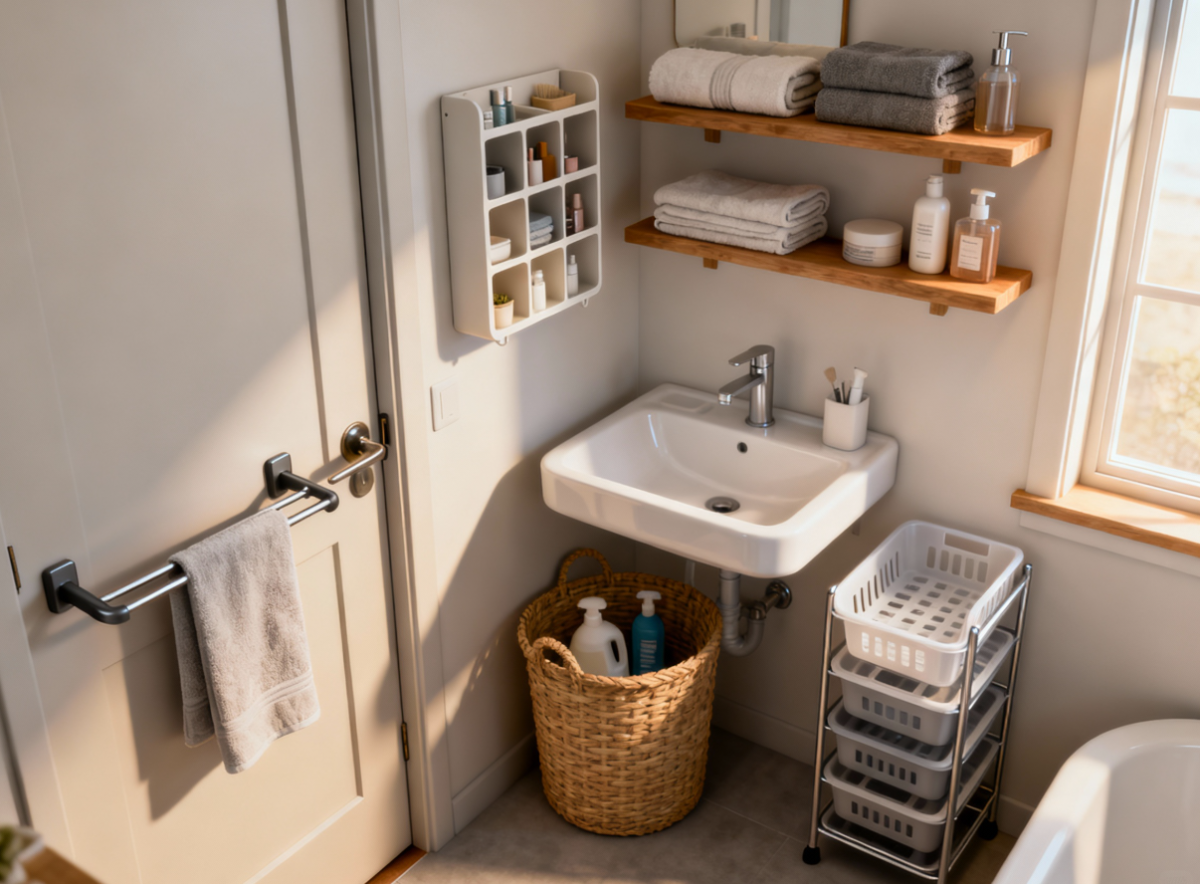
Utilize Vertical Space With Shelving

When you’re short on floor space, utilizing vertical storage can transform your small bathroom into a more organized and functional area.

Installing shelves above the toilet or next to the sink maximizes your wall space and keeps essentials within easy reach. Use decorative baskets or bins on these shelves to store toiletries and towels, creating a neat, cohesive look.

You can also consider floating shelves; they offer a modern touch while providing extra storage without occupying floor space.

Don’t forget to arrange items by frequency of use—store daily essentials at eye level and seasonal items higher up.

Invest in Over-the-Door Organizers

Maximizing storage in a small bathroom often means thinking outside the box, or in this case, the door. Over-the-door organizers are a fantastic solution for utilizing unused space.

You can hang them on your bathroom door to store toiletries, cleaning supplies, or even towels. This keeps your essentials within reach while freeing up counter space.

Look for organizers with pockets or shelves to fit your needs. They’re easy to install and come in various styles, so you can find one that matches your decor.

Investing in these organizers can greatly enhance your bathroom’s functionality and organization without costly renovations.

Opt for Multi-Functional Furniture

In small bathrooms, choosing multi-functional furniture can make a significant difference in both storage and style.

Look for pieces that serve dual purposes, like a vanity with built-in storage or a bench that doubles as a laundry hamper. Wall-mounted shelves can provide display space while keeping essentials within reach.

Consider a stool that can be tucked away when not in use—perfect for extra seating or a stepping stool. Opting for modular furniture lets you adapt your space as needed.

With smart choices, you’ll maximize functionality without sacrificing aesthetics, creating an inviting, organized bathroom that meets all your needs.

Create Hidden Storage With Baskets

Baskets can transform your small bathroom into a clutter-free oasis, offering stylish and practical hidden storage solutions. You can place them under the sink, on shelves, or even hang them on hooks to maximize space.

Use decorative baskets to store toiletries, towels, or cleaning supplies, keeping them organized yet out of sight. Consider varying sizes and materials to add texture and interest. Label each basket for easy access, making it simple to find what you need.

With a little creativity, you’ll create a neat and inviting atmosphere, turning your small bathroom into a functional and beautiful space.

Use Magnetic Strips for Small Items

Sometimes, small items in a bathroom can easily get lost or clutter your counter space. A simple solution is to use magnetic strips.

Attach a strip to the wall or inside a cabinet door, and you’ll create instant storage for metal items like tweezers, scissors, or bobby pins. This keeps them visible and accessible while freeing up your surfaces.

You can even paint the strip to match your decor for a seamless look. By using magnetic strips, you’ll maximize your storage without any major renovations, making your small bathroom feel more organized and functional.

Give it a try!

Hang Hooks for Towels and Accessories

Adding hooks for towels and accessories can drastically improve the functionality of your small bathroom. By installing a few hooks on the back of the door or walls, you’ll free up valuable space and keep your towels within easy reach.

Choose decorative hooks that match your bathroom’s style for an added aesthetic touch. You can also hang accessories like robes or loofahs, keeping everything organized and off the floor.

Consider using adhesive hooks for a no-drill solution, perfect for renters. With this simple addition, you’ll create a more efficient and pleasant bathroom experience without the need for major renovations.

Incorporate a Rolling Cart for Flexibility

Consider rolling in a versatile cart to maximize storage in your small bathroom. A rolling cart offers flexibility, allowing you to easily move essentials wherever you need them.

Use it to store extra towels, toiletries, or cleaning supplies, keeping everything organized and within reach. When you need more space, simply roll it into a corner or behind the door.

Choose a cart with multiple shelves or baskets for even better organization. Plus, with various styles available, you can find one that complements your decor.

Embrace this smart solution to enhance functionality without any major renovations!

Frequently Asked Questions

How Can I Maximize Storage Without Sacrificing Style?

You can maximize storage without sacrificing style by using multifunctional furniture, incorporating stylish baskets, and installing floating shelves.

Keep colors and materials cohesive, ensuring everything blends seamlessly while still providing practical storage solutions for your space.

What Are the Best Materials for Bathroom Shelving?

The best materials for bathroom shelving are water-resistant options like bamboo, metal, or treated wood.

These materials combine durability with style, ensuring your shelves can handle humidity while looking great in your space.

How Do I Choose the Right Over-The-Door Organizer?

To choose the right over-the-door organizer, consider your storage needs, door height, and the organizer’s weight capacity.

Make sure it fits your style and complements your bathroom decor for a cohesive look.

Can I Paint or Customize Storage Solutions?

Yes, you can definitely paint or customize storage solutions!

Choose colors or patterns that match your style, and use removable adhesive or paint designed for plastics.

This way, you’ll refresh your space without permanent changes.

What Are Some Budget-Friendly Storage Options?

You can use floating shelves, over-the-toilet organizers, and storage bins for budget-friendly options.

Repurpose old furniture or use baskets to maximize space.

Consider tiered carts for easy access to essentials without breaking the bank.

Conclusion

With these seven clever storage solutions, you can transform your small bathroom into an organized oasis without any major renovations. By utilizing vertical space, investing in smart organizers, and incorporating multi-functional furniture, you’ll maximize every inch. Don’t forget to use hidden storage options and clever accessories like magnetic strips and hooks. A rolling cart adds flexibility for your essentials. Get started today, and enjoy a clutter-free bathroom that feels spacious and inviting!

Categories
Uncategorized

Remodeling vs. Renovation: Understanding the Difference Before You Hire a Contractor

Imagine stepping into a newly transformed space, where every corner reflects your vision. Before you can achieve that, it’s essential to understand the difference between remodeling vs. renovation. Each approach serves a distinct purpose and can greatly impact your project’s outcome. As you consider hiring a contractor, knowing which option aligns with your goals can save you time and money. So, how do you determine the right path for your home?

Defining Remodeling and Renovation

When you think about home improvements, it’s easy to confuse remodeling with renovation, but they actually signify different processes.

Remodeling involves changing the structure or layout of a space, which can dramatically transform your home. You might embrace popular remodeling trends, like open-concept living spaces or modern kitchen islands, to create a more inviting atmosphere.

On the other hand, renovation focuses on restoring or updating existing features without altering the layout, often reflecting various renovation styles, such as historic preservation or modern upgrades.

By understanding these distinctions, you can better express your vision to contractors, ensuring your home embodies the warmth and comfort you desire.

Ultimately, knowing the difference helps you create a space that truly feels like home.

Key Differences Between Remodeling and Renovation

Understanding the key differences between remodeling and renovation can save you time and money on your home improvement projects.

Remodeling typically involves changing the structure or layout of a space to meet your design intentions, like converting a basement into a functional living area. This can greatly alter project outcomes, enhancing both aesthetics and functionality.

On the other hand, renovation focuses on restoring or improving existing features without altering the overall structure, such as updating a kitchen with new cabinets and countertops.

Knowing these distinctions helps you clarify your goals, ensuring you hire the right contractor for the job.

Whether you’re looking to reimagine a space or simply refresh it, understanding these differences is crucial for achieving your vision.

When to Choose Remodeling

Have you ever felt that your home doesn’t quite fit your lifestyle? If so, it might be time to contemplate remodeling.

This approach allows you to make creative design choices that reflect your personality and meet your needs. Whether you want to create an open-concept living space or add a functional home office, remodeling can transform your environment into a place where you feel truly at home.

It’s perfect for those seeking functional upgrades that enhance both comfort and efficiency. By reimagining your space, you can improve how you live and entertain.

When to Choose Renovation

While many homeowners seek to personalize their spaces through remodeling, renovation offers a different approach that can be equally rewarding.

If you’re looking to improve your home’s functionalityenhance its value, or simply bring it up to date without altering its core structure, renovation is the way to go.

There are various renovation types, from kitchen upgrades to bathroom enhancements, each providing specific benefits.

For instance, modernizing your kitchen can boost energy efficiency and create a more inviting atmosphere for family gatherings.

By choosing renovation, you’re not just improving your space; you’re investing in your home’s future.

Cost Considerations for Remodeling vs. Renovation

When weighing the financial aspects of remodeling versus renovation, it’s essential to contemplate both the immediate costs and long-term value. Start with a thorough budget analysis to determine what you can afford.

Remodeling typically involves a higher cost breakdown due to structural changes, while renovation often focuses on cosmetic improvements, making it more budget-friendly.

Consider hidden expenses for both options, such as permits or unexpected repairs. Prioritize your needs and desires to guarantee you’re making a wise investment.

Impact on Home Value

The impact on home value is an essential factor to evaluate when deciding between remodeling and renovation.

Remodeling often enhances aesthetic appeal and functionality, which can lead to a favorable home appraisal. Upgraded kitchens or bathrooms typically attract buyers, reflecting positively on your investment.

On the other hand, renovation focuses on restoring or maintaining a property’s original features, which may not greatly boost value but can preserve it in line with market trends.

Understanding these trends is important; a well-planned remodel might yield a higher return, while thoughtful renovations can help maintain your home’s character.

Ultimately, aligning your choice with current market trends will help guarantee you maximize your home’s value, creating a space that’s both inviting and financially sound.

The Role of a Contractor in Your Project

When you’re ready to start your remodeling or renovation project, finding the right contractor can make all the difference.

Effective communication and collaboration with them will guarantee your vision comes to life while managing timelines keeps everything on track.

Let’s explore how choosing a skilled contractor can enhance your project experience.

Finding the Right Contractor

How do you choose the right contractor for your remodeling or renovation project? Start by evaluating contractor qualifications.

Look for licensed and insured professionals who’ve experience in projects similar to yours. Check their references and read reviews to gauge their reputation.

It’s essential to discuss project timelines upfront; a reliable contractor should provide a clear schedule and stick to it. Ask about their approach to managing any unforeseen issues that may arise.

Don’t hesitate to interview multiple contractors to compare their expertise and communication styles. Finding a contractor who aligns with your vision and values can make all the difference.

You deserve someone who understands your needs and can bring your project to life efficiently and effectively.

Communication and Collaboration

Effective communication and collaboration are essential to the success of your remodeling or renovation project, as they directly influence how smoothly everything runs.

When you and your contractor engage using effective collaboration techniques, you’ll create a teamwork atmosphere that fosters trust and shared goals. Discuss your vision openly, and don’t hesitate to express your concerns.

Different communication styles can impact your project, so find a rhythm that works for both of you. Whether it’s regular check-ins or detailed progress updates, maintaining this dialogue helps you stay on the same page.

Managing Project Timelines

While maneuvering the complexities of a remodeling or renovation project, managing timelines becomes essential, and your contractor plays a pivotal role in this process. They’re your go-to person for effective timeline management, guaranteeing that every phase of your project aligns with your expectations.

By establishing clear project scheduling, your contractor can anticipate potential delays and proactively address them, keeping your project on track. Regular updates and open communication help you stay informed and involved, fostering a sense of belonging in the process.

With an experienced contractor guiding you, you can navigate timelines confidently, making your vision a reality while minimizing stress. Remember, a well-managed timeline not only enhances efficiency but also guarantees a smoother, more enjoyable renovation experience.

Planning Your Project Scope

As you commence on your remodeling or renovation journey, defining your project scope is essential for a successful outcome. Start by outlining your project objectives—what do you want to achieve? Whether it’s creating a more functional space or enhancing aesthetics, clarity here will guide your decisions.

Next, factor in your budget constraints. Knowing how much you can invest helps prioritize features and materials while avoiding costly surprises.

Collaborate with your contractor to guarantee your vision aligns with practical possibilities. This collaboration fosters a sense of belonging, as you’re both working towards a common goal.

Common Misconceptions

Many people confuse remodeling and renovation, assuming they’re interchangeable terms. This misunderstanding leads to myths debunked, making it essential for you to grasp the terminology clarity.

Remodeling involves altering the structure or function of a space, like changing a kitchen layout or adding a room. In contrast, renovation focuses on restoring or improving an existing structure without changing its purpose, such as repainting or replacing fixtures.

By recognizing these distinctions, you’ll not only communicate better with contractors but also make more informed decisions for your project. Understanding the difference fosters confidence and guarantees you’re on the same page, creating a sense of belonging in your home transformation journey.

Don’t let misconceptions hold you back!

Tips for Effective Communication With Your Contractor

Effective communication with your contractor is essential for a successful project.

Start by clearly defining your expectations, using visual aids to illustrate your vision, and establishing regular check-ins to keep everything on track.

This approach not only minimizes misunderstandings but also fosters a collaborative environment.

Clearly Define Expectations

How can you guarantee your vision for the remodeling or renovation project aligns with your contractor’s understanding? Start by clearly defining your expectations.

Outline your project goals, detailing what you envision for the space. Share any specific design elements or functionalities you want to include. This clarity helps foster expectation alignment between you and your contractor, ensuring everyone’s on the same page.

Regularly check in with your contractor to discuss progress and address any concerns. This open line of communication creates a sense of belonging, making you feel more involved in the process.

Use Visual Aids

What’s the best way to guarantee your contractor truly understands your vision? Using visual aids is key. A visual representation of your ideas can bridge any communication gaps.

Consider creating mood boardssketches, or even digital designs to clarify your expectations. Infographic examples can help convey complex concepts in a simple, digestible format, making it easier for your contractor to grasp your style and preferences.

Don’t underestimate the power of visuals; they foster a shared understanding and can prevent misunderstandings down the line. When you present your ideas visually, you invite your contractor into your creative process, fostering a sense of collaboration and belonging that’s essential for a successful project.

Establish Regular Check-ins

To guarantee your project stays on track and meets your expectations, establishing regular check-ins with your contractor is crucial. Schedule consistent meetings—whether weekly or bi-weekly—to discuss project updates and address any concerns.

This not only fosters open communication but also builds trust, making you feel more connected to the process. During these check-ins, ask about contractor availability to confirm they’re aligned with your timeline and any upcoming deadlines.

Make certain you’re clear about your goals and any changes you wish to implement. By actively participating in these discussions, you’ll feel more engaged and informed, helping create a collaborative environment that contributes to the success of your remodeling or renovation project.

Real-Life Examples of Remodeling and Renovation Projects

Many homeowners find themselves contemplating the difference between remodeling and renovation when starting on a home improvement project.

For instance, a kitchen expansion that opens up space and creates a more functional layout is a perfect example of remodeling. You’re not just updating; you’re reimagining the entire area to fit your lifestyle better.

On the other hand, a bathroom upgrade, where you replace fixtures and update tiles without changing the layout, falls under renovation. It’s about revitalizing what you already have.

Understanding these distinctions helps you make informed decisions, ensuring your project aligns with your vision and needs.

Whether you’re expanding or upgrading, knowing the difference can lead to a successful home transformation.

Categories
Uncategorized

The Benefits of Installing Wood Floor Grates

Many homeowners overlook the advantages of installing wood floor grates, yet they can significantly enhance your living space. These grates provide effective ventilation, helping to regulate temperature and moisture control in your home. Additionally, wood floor grates seamlessly blend with your decor, adding a touch of elegance while improving air circulation. By investing in quality wood grates, you can also prolong the lifespan of your flooring, ensuring a comfortable environment year-round.

Benefits of Wood Floor Grates

By installing wood floor grates, you unlock numerous advantages that enhance both functionality and style in your home. These grates facilitate better airflow and improve heating efficiency, ensuring a cozy environment, especially during colder months. Furthermore, they add a unique design touch, blending seamlessly with various interior styles, making it an investment that pays dividends in comfort and aesthetics.

Improved Air Circulation

Wood floor grates enhance air circulation by allowing heated or cooled air to flow freely through your living spaces. This improved airflow results in a more consistent temperature throughout your home, minimizing hot or cold spots. In homes with central heating and cooling systems, these grates ensure that air reaches all corners effectively, leading to energy efficiency and comfort.

Enhanced Aesthetic Appeal

The aesthetics of your space can be significantly elevated with the addition of wood floor grates. They provide a warm, inviting look that complements hardwood floors, allowing for a cohesive design. Available in various styles and wood types, you can choose grates that match your interior decor, adding texture and character to rooms. Their elegant design can turn a functional feature into a visually appealing element.

Choosing the right wood floor grate not only harmonizes with your flooring but also serves as a design focal point. For instance, intricate patterns or custom finishes can enhance traditional spaces, while sleek, minimalist grates can suit modern designs. High-quality wood grates not only boost visibility but also reflect your personal style, making each room feel more intentional and curated. You improve your home’s design without sacrificing practicality, creating a stunning balance between form and function.

Durability and Longevity

Wood floor grates provide exceptional durability and longevity, making them a wise investment for your home. Unlike other materials, quality wood can withstand heavy foot traffic and resist wear over time. When properly installed and cared for, these grates have an impressive lifespan, retaining their aesthetic appeal and functionality for decades.

Material Quality

Choosing high-quality wood species, such as oak or maple, greatly impacts the longevity of your floor grates. These hardwoods are naturally resistant to dents and scratches, ensuring they maintain their beauty even in high-traffic areas. Solid construction coupled with premium finishes helps to enhance durability, making them a reliable choice for your flooring needs.

Maintenance Requirements

Your wood floor grates do require some maintenance to keep them looking their best. Regular cleaning, such as sweeping or vacuuming, removes dirt and debris that can cause scratches. Additionally, applying a protective finish every few years will preserve the wood’s integrity and luster, while ensuring longevity.

Proper maintenance involves not only routine cleaning but also scheduled inspections for signs of wear or damage. Addressing minor issues, like tightening loose boards or reapplying finish, can prevent larger problems down the line. Consider using a gentle cleaner specifically designed for wood, and avoid excessive moisture to maintain the quality of your floor grates. This proactive approach ensures they remain a beautiful feature in your space for many years.

Environmental Considerations

When considering your home’s impact on the environment, wood floor grates offer several advantages that align with eco-conscious practices. Sourced from renewable forests, they help reduce the carbon footprint associated with flooring materials. Plus, sustainable management practices ensure that your choice supports biodiversity and forest health, making it a responsible option for environmentally aware homeowners.

Sustainability of Wood

Opting for wood grates means choosing a sustainable material that, when responsibly sourced, contributes positively to the environment. Wood is biodegradable and can be sustainably harvested, making it a preferable choice compared to synthetic flooring options. By selecting wood grates certified by organizations like the Forest Stewardship Council (FSC), you can ensure that your choice reflects environmentally sound practices.

Energy Efficiency

Your home’s energy efficiency can significantly benefit from installing wood floor grates. They facilitate better air circulation compared to other materials, helping to regulate indoor temperature and reduce energy usage for heating and cooling. Improved airflow can lead to lower utility bills, making wood grates a smart choice for both comfort and cost savings.

By enhancing air circulation, wood floor grates assist in minimizing the reliance on heating and cooling systems. This improvement can lead to energy savings of up to 20% annually, depending on your home’s layout and existing systems. Additionally, maintaining a consistent indoor temperature reduces wear on HVAC systems, extending their lifespan and further decreasing energy costs. The integration of wood grates not only contributes to a more comfortable living environment but also represents a sustainable approach to home design that prioritizes efficiency and environmental health.

Installation Process

Installing wood floor grates involves careful planning and precise execution to ensure optimal airflow and aesthetics. Begin by assessing the areas where you intend to install the grates, ensuring compatibility with your existing flooring. Proper installation not only enhances functionality but also contributes to the overall appearance of your space.

Tools and Materials Needed

You’ll need specific tools and materials to facilitate a smooth installation. Gather necessary items such as a measuring tape, utility knife, wood glue, wood floor grates, and finish nails. Having the right tools on hand saves time and helps achieve a professional result.

Step-by-Step Guide

The installation of wood floor grates can be broken down into several clear steps that will help you achieve a seamless finish. Begin by measuring the space where you will install the grate, cut the opening as required, and ensure a snug fit. Next, secure the grate with wood glue and finish nails.

Step-by-Step Guide

Step Description
1. Measure Accurately measure the area for the grate installation.
2. Cut Opening Carefully cut the opening in the flooring to fit the grate.
3. Fit Grate Place the wood floor grate in the cut-out area to ensure a snug fit.
4. Secure Use wood glue and finish nails to fasten the grate in place.

Each step in the process requires attention to detail for success. After cutting the flooring, it’s important to sand the edges for a smooth finish. When securing the grate, ensure it sits level with the surrounding floor to avoid tripping hazards. Lastly, cleanup any excess glue for a polished appearance and consistent airflow throughout your space.

Additional Step-by-Step Guidelines

Step Note
5. Finish Edges Smooth any rough edges with sandpaper for safety and aesthetics.
6. Final Check Inspect the installation to ensure stability and a seamless fit.

Cost Considerations

Initial Investment

When evaluating wood floor grates, consider the initial investment, which can vary based on material quality and design complexity. High-quality wood options may range from $15 to $40 per square foot, affecting your budget significantly. It’s wise to factor in installation costs, as professional installation can add an additional $5 to $15 per square foot. Careful planning of your project can help you allocate funds effectively.

Long-Term Value

Investing in wood floor grates offers substantial long-term value. Not only do they enhance the aesthetic appeal of your space, but their durability also contributes to increasing your property’s overall value. Homebuyers often prefer features that improve air circulation and contribute to efficient heating and cooling. This means you can see a solid return on your investment when it’s time to sell.

Additionally, wood floor grates can improve the efficiency of your HVAC system by promoting better airflow, which may lead to reduced energy bills over time. On average, homeowners experience a 10-20% decrease in utility costs with effective ventilation solutions like these. By selecting wood floor grates, you’re not just opting for enhanced visual appeal; you’re making a choice that pays off in both comfort and savings in the years to come.

Common Misconceptions

Misconceptions surrounding wood floor grates can deter many from considering them for their spaces. Often, people believe that these grates are too fragile, aesthetically unpleasing, or unsuitable for modern homes. However, these assumptions fail to recognize the advancements in design and durability that make wood floor grates a valuable addition to any environment.

Myths About Wood Floor Grates

You might think wood floor grates are noisy or prone to wear and tear, creating an inconvenient experience. However, many modern designs incorporate noise-dampening features and are crafted from high-quality materials designed for longevity. This challenges the stereotype that they won’t stand the test of time.

Clarifying Misunderstandings

Another common misunderstanding is that wood floor grates require excessive maintenance. In reality, they often need the same care as your regular flooring. A simple cleaning routine and occasional refinishing can keep them looking and functioning beautifully over time, proving to be more practical than many assume.

To clarify further, the maintenance of wood floor grates is often comparable to caring for hardwood flooring, which typically involves sweeping, vacuuming, and periodic polishing. Many wood floor grates are finished with protective coatings that enhance their durability and resistance to moisture. This means that regular upkeep can be minimal, allowing you to enjoy the aesthetic benefits without the burden of excessive maintenance. With a smart choice of wood and finishes, these grates can endure heavy foot traffic just like any other flooring option, making them a viable choice for both residential and commercial settings.

Final Words

Considering all points, installing wood floor grates can significantly enhance your home’s aesthetic while improving air circulation and reducing energy costs. You benefit from increased durability and style, as these grates blend seamlessly with various interior designs. Their ability to mask unsightly vent openings creates a polished look in your space, ensuring that you enjoy both functionality and beauty. Investing in wood floor grates not only elevates your home’s appearance but also contributes to a more comfortable living environment, making it a worthwhile addition for any homeowner.

Categories
Uncategorized

Simple Door Hardware Upgrade: How to Replace a Doorknob in 5 Steps

An old, sticky, or brassy doorknob can instantly date a room and even make accessing a space frustrating. Fortunately, learning How to Replace a Doorknob is one of the easiest, fastest, and most satisfying DIY projects you can complete. Whether you are swapping a basic passage handle for a privacy lock or simply refreshing outdated hardware for a modern look, this task requires nothing more than a few basic tools and about 15 minutes of your time. If you can handle a screwdriver, you can tackle this project. Follow our simple, step-by-step instructions to achieve a beautiful, functional update today!

Upgrading your doorknob can dramatically improve your space’s look and feel without breaking the bank. This simple DIY project requires just a few tools and a bit of your time. By following five straightforward steps, you can achieve a polished and functional result that elevates your home’s entrance. Ready to tackle this easy upgrade? Let’s explore how to get started.

Gather Your Tools and Materials

Before you plunge into replacing your doorknob, it’s essential to gather the right tools and materials.

Start with your tool selection: you’ll need a screwdriver, a new doorknob, and possibly a drill. A flathead and Phillips screwdriver will cover most types of doorknobs.

Next, consider material types. Choose a doorknob that matches your style, whether it’s brass, stainless steel, or a more modern finish. If you’re looking for durability, opt for metal over plastic.

Having the right tools and materials won’t only streamline the process but also guarantee your new doorknob enhances the look and feel of your space.

With everything ready, you’ll feel confident in your ability to complete this upgrade successfully.

Remove the Old Doorknob

With your tools and materials at the ready, it’s time to remove the old doorknob.

Start by identifying the knob type—either a passage, privacy, or dummy knob. Most have visible screws on the side or back. Use a screwdriver to unscrew these, employing appropriate removal techniques.

If you can’t see screws, look for a small pinhole; this often hides a release mechanism. Insert a paperclip or similar tool to push the pin and release the knob.

Once you’ve removed the knob, take off the faceplate and latch mechanism by unscrewing them as well. This step is essential for a smooth installation of your new doorknob, ensuring everything aligns perfectly for your door.

Install the New Doorknob

Now it’s time to install your new doorknob. First, align the doorknob components with the holes in the door. Depending on the doorknob styles you’ve chosen, you may need specific installation techniques.

Insert the spindle through the latch and attach the exterior knob, ensuring it fits snugly. Next, secure the interior knob, aligning it with the spindle and tightening any screws. Be careful not to overtighten, as this can damage the doorknob.

If your knob has a locking mechanism, make sure it’s positioned correctly. Finally, check that everything feels secure and functions smoothly.

With your new doorknob in place, you’ll enjoy a refreshed look that enhances your home’s style and functionality.

Test the Functionality

After securing your new doorknob, it’s time to test the functionality to confirm everything works as it should.

Start by turning the doorknob to guarantee it rotates smoothly without any resistance. Next, check the doorknob alignment by closing the door and observing if it latches correctly. If it doesn’t catch, you might need to adjust the strike plate or the doorknob itself.

Give the knob a gentle push to see if it locks and releases easily. Pay attention to any unusual sounds; these could indicate misalignment.

Finally, verify the door opens and closes without sticking. Effective functionality testing will help you enjoy your upgraded doorknob, making your space feel more welcoming and secure.

Final Touches and Cleanup

Once you’ve confirmed your new doorknob functions properly, it’s time to focus on the final touches and cleanup.

Start with a final inspection to guarantee everything is secure; check screws and alignment one last time.

If you’ve got any decorative accents, like a matching plate or trim, now’s the moment to install those for a polished look.

Wipe down the area around the doorknob to remove fingerprints or dust, guaranteeing it looks as good as it works.

Don’t forget to dispose of any packaging and old hardware responsibly.

With these steps, you’ll not only enjoy a functional door but also create an inviting atmosphere that reflects your personal style and care for your space.

Categories
Uncategorized

5 DIY Projects That Add the Most Resale Value to Your Home


We’ve zeroed in on the 5 DIY Projects That Add the Most Resale Value to Your Home, concentrating on simple, achievable tasks that appeal directly to modern buyers. From enhancing curb appeal to updating kitchens, these projects prove you don’t need a contractor to make a significant financial impact on your property’s worth.

Not all home improvements are created equal—especially when it comes to selling your property. If you’re looking to boost your asking price without breaking the bank on a professional renovation, you need to focus on key areas that offer the highest return on investment (ROI).

If you want to boost your home’s resale value, start with landscaping to enhance curb appeal. Upgrade your kitchen with modern fixtures, and paint the bathroom for a fresh look. Create an inviting outdoor space by adding comfortable seating and greenery. Finally, installing energy-efficient features can greatly lower utility costs and attract buyers. Follow these tips, and you’ll see how simple changes can make a big impact on your home’s value. There’s much more to explore!

Revamp Your Curb Appeal With Landscaping

When you want to boost your home’s resale value, revamping your curb appeal with landscaping is a smart move.

Start by trimming overgrown bushes and trees to create a clean, inviting look. Add colorful flowers or low-maintenance plants to enhance visual interest. Consider installing a fresh layer of mulch for a polished finish.

Don’t forget about your lawn—regular mowing and fertilizing can make a huge difference. You might even create defined garden beds or pathways to guide visitors.

Upgrade Your Kitchen With New Fixtures

Upgrading your kitchen with new fixtures can dramatically enhance both its functionality and aesthetic appeal.

Start with modern faucets that not only look great but also improve water efficiency. Consider adding stylish cabinet hardware to refresh your cabinets without a full remodel.

Pendant lights over the island can create a focal point and improve lighting. Don’t forget about your sink; a deep, stainless-steel model adds both utility and style.

Finally, choose a backsplash that complements your new fixtures, tying the whole look together. These small updates can greatly boost your home’s resale value while making your kitchen a more pleasant space.

Enhance Your Bathroom With a Fresh Coat of Paint

After enhancing your kitchen with modern fixtures, it’s time to turn your attention to the bathroom.

fresh coat of paint can make a significant difference without breaking the bank. Choose light, neutral colors to create a spacious feel or soft pastels for a calming atmosphere.

Don’t forget to prep the surfaces by cleaning and priming them for better adhesion. Use mold-resistant paint for durability, especially in humid environments.

This simple update not only revitalizes the space but also appeals to potential buyers, making your home more attractive and increasing its resale value.

Grab your brush and get started!

Create an Inviting Outdoor Space

While you may focus on the interior of your home, don’t overlook the potential of your outdoor space to boost resale value.

Start by adding comfortable seating, like a patio set or a hammock, to create a cozy atmosphere. Incorporate greenery with potted plants or a small garden, enhancing visual appeal.

Consider installing a fire pit for evening gatherings, making it inviting year-round. A well-defined pathway leading to your outdoor area can also improve functionality.

With minimal investment, you can transform your backyard into an appealing oasis, making it a standout feature for potential buyers.

Install Energy-Efficient Features

As you look to enhance your home’s value, installing energy-efficient features can be a game-changer.

Begin with upgrading to Energy Star-rated appliances, which not only save energy but also appeal to eco-conscious buyers. Consider adding programmable thermostats, which help regulate heating and cooling costs.

Replacing old windows with double or triple-pane glass can greatly improve insulation. Don’t forget about solar panels; they can drastically reduce electricity bills and attract buyers looking for sustainability.

Finally, enhancing insulation in your attic or walls can make your home more comfortable and energy-efficient. These updates can lead to a higher resale value in today’s market.

Frequently Asked Questions

Which DIY Projects Are Most Cost-Effective for Resale Value?

You’ll find that updating kitchens and bathrooms, adding curb appeal with landscaping, and freshening up paint are some of the most cost-effective DIY projects.

They greatly boost your home’s appeal and resale value without breaking the bank.

How Much Value Does a New Roof Add to My Home?

A new roof can add significant value to your home, often recouping about 60-70% of its cost.

Besides, it enhances curb appeal and attracts buyers, making it a smart investment for resale purposes.

Are There Any DIY Projects to Avoid for Resale?

You should avoid overly personalized renovations, like unique wallpaper or extravagant landscaping.

These can deter potential buyers.

Instead, focus on neutral updates that appeal to a wider audience, ensuring your home remains market-friendly.

What Is the Average ROI for Kitchen Renovations?

The average ROI for kitchen renovations hovers around 60-80%.

You’ll see better returns by focusing on modern updates and practical layouts.

Just remember, quality materials and craftsmanship can greatly boost your investment’s value.

Can DIY Projects Actually Decrease My Home’s Value?

Yes, DIY projects can decrease your home’s value if they’re poorly executed or don’t align with neighborhood standards.

Buyers might view shoddy work as a red flag, leading to lower offers or longer sell times.

Conclusion

Mastering these 5 DIY Projects That Add the Most Resale Value to Your Home gives you a major advantage in a competitive market. By focusing your limited time and budget on high-impact areas like curb appeal, updated kitchens, minor bathroom facelifts, and smart, energy-efficient fixes, you appeal to buyers’ desire for move-in readiness and low future costs. Remember, buyers often pay a premium for properties they perceive as requiring zero immediate work. Choose one of these projects this weekend, and start building equity and appeal today!

By tackling these DIY projects, you can significantly boost your home’s resale value. Revamping your curb appealupgrading your kitchen, refreshing your bathroom, creating a welcoming outdoor space, and adding energy-efficient features are all great ways to make a lasting impression on potential buyers. Not only will these improvements enhance your living experience, but they’ll also pay off when it’s time to sell. So, grab your tools and get started on these rewarding upgrades today!

Categories
Uncategorized

Solar Panels Pros And Cons

Making the decision to install a solar energy system on your home is a major financial and environmental choice. Before you sign a contract, it’s essential to thoroughly analyze the Solar Panels Pros And Cons to determine if the investment makes sense for your specific property and energy consumption habits. While the benefits—like eliminating electric bills and utilizing substantial government tax credits—are highly attractive, the initial investment, roof requirements, and system upkeep must also be carefully considered. We break down the advantages and disadvantages to give you a clear, balanced picture of solar ownership.

Solar panels come with a mix of pros and cons. You can save on electricity bills and reduce your carbon footprint, making them an eco-friendly investment. Government incentives help with initial costs, too. However, you’ll face significant upfront expenses, and energy production can be weather dependent. Space for installation might also be a challenge. Understanding these factors can help you make an informed choice about solar energy. There’s more to reflect upon, so keep exploring!

Benefits of Solar Panels

When you consider switching to solar panels, you’ll discover several compelling benefits that can enhance your lifestyle and reduce your environmental impact.

Recent solar technology advancements have greatly improved solar panel efficiency, allowing you to generate more energy from sunlight. This means you’ll rely less on traditional energy sources, making your home more sustainable.

Additionally, solar energy storage solutions enable you to store excess energy for use during peak demand, ensuring you always have power when you need it.

You might also find government solar programs that offer incentives, making the change easier and more attractive.

Keeping an eye on solar energy trends will help you stay informed about innovations that can further enrich your solar experience and lifestyle.

Cost Savings and Financial Incentives

Not only do solar panels provide significant long-term cost savings, but they also come with various financial incentives that can make the shift to renewable energy even more appealing.

By installing solar panels, you can enjoy substantial financial returns over time, as reduced electricity bills add up. Many homeowners benefit from government rebates and tax credits, which can offset the initial investment costs.

An investment analysis often shows that solar energy systems can pay for themselves in just a few years, leading to impressive long-term savings. Plus, as energy prices rise, your savings will grow, making solar panels not only an eco-friendly choice but also a smart financial decision.

Embrace the benefits and start saving today!

Environmental Impact

Installing solar panels not only boosts your financial savings but also greatly benefits the environment. By harnessing renewable energy sources, you’re contributing to significant carbon footprint reduction, which helps combat climate change.

Solar panels generate electricity without emitting harmful greenhouse gases, making them an eco-friendly choice. Technological advancements have improved their efficiency, allowing for better energy capture and reduced waste.

Additionally, integrating solar energy into your home can positively influence local ecosystems. While it’s essential to evaluate the materials used in solar panel production, the long-term benefits often outweigh these concerns.

Energy Independence

By opting for solar panels, you can achieve a greater degree of energy independence while reducing reliance on traditional power sources. This change enhances your energy security, as you tap into renewable resources that are abundant and sustainable.

With solar energy, you can work towards grid independence, minimizing your vulnerability to fluctuating energy prices and supply disruptions. Incorporating energy storage solutions, like batteries, allows you to store excess energy for later use, further increasing your autonomy.

Additionally, understanding the policy implications surrounding solar energy can help you navigate incentives and regulations that support your shift.

Ultimately, investing in solar panels not only empowers you but also contributes to a more resilient energy future.

Installation and Maintenance Considerations

While choosing to install solar panels can be a rewarding decision, it’s vital to evaluate the complexities of installation and ongoing maintenance.

The installation process involves evaluating your roof compatibility to guarantee it can support the panels. Hiring qualified technicians is essential, as their expertise can affect system performance and longevity.

Once installed, maintenance frequency typically ranges from annual checks to occasional cleaning, depending on your environment. You’ll also want to implement system monitoring to track performance and detect issues early.

Aesthetic and Property Value Effects

When considering solar panels, the impact on your home’s aesthetics and property value is essential. You’ll want to evaluate how they fit into your home design and enhance curb appeal.

Some homeowners find that solar panels can be a stylish addition, blending well with modern architecture. However, in neighborhoods where traditional aesthetics prevail, they might stand out negatively.

Proper landscaping integration can help mitigate this issue, creating a cohesive look. Plus, many buyers appreciate energy-efficient features, which can positively influence property resale value.

Ultimately, balancing your personal taste with neighborhood aesthetics can lead to a wise investment that enhances both the beauty and value of your home.

Limitations and Drawbacks of Solar Energy

Although solar energy offers numerous benefits, it also comes with several limitations and drawbacks that homeowners should consider.

One major issue is the initial investment; the cost of solar panels and installation can be significant. You’ll also need adequate space for the panels, which may not be feasible for everyone.

Additionally, solar energy relies heavily on weather conditions, making it less effective on cloudy or rainy days. This weather dependency can lead to inconsistent energy production, requiring efficient energy storage solutions to guarantee reliability.

Finally, recycling concerns regarding solar panels can pose environmental challenges at the end of their lifecycle.

Weighing these limitations against the benefits is essential for making an informed decision about solar energy for your home.

Frequently Asked Questions

How Long Do Solar Panels Typically Last Before Needing Replacement?

Imagine sunlight transforming into energy; solar panels typically last 25-30 years. Over time, efficiency degradation occurs, so consider warranty coverage and potential replacement costs. Regular maintenance guarantees your investment shines bright for years to come.

Can Solar Panels Work in Cloudy or Rainy Weather?

Yes, solar panels can work in cloudy or rainy weather. While their solar efficiency decreases, they still produce energy on cloudy days and in rainy conditions, ensuring you get some energy production regardless of the weather impact.

What Happens to Solar Panels During Severe Weather Events?

During severe weather, solar panels show impressive storm resilience. They’re designed to withstand winds up to 140 mph, resist hail damage, and handle snow accumulation, but flood risks can still affect their performance and maintenance.

Are There Solar Panel Options for Renters or Non-Homeowners?

Yes, as a renter, you can explore solar leases, community solar projects, and solar power purchase agreements. Additionally, consider portable solar options if rooftop installations aren’t feasible for your living situation.

How Do Solar Panels Affect Home Insurance Policies?

Installing solar panels can enhance your home’s value, but it may also affect your home insurance. You’ll need to discuss coverage limits, premium adjustments, and installation disclosures to address any liability concerns with your insurer.

Categories
Uncategorized

DIY Shiplap Wall Installation: Ultimate Guide

Installing a shiplap wall can transform your space with a unique touch. Start by gathering your materials and tools, and prep the wall by ensuring it’s clean and smooth. Measure and cut your shiplap boards accurately, then paint or stain them according to your design vision. Secure the boards in place, filling any gaps and nail holes for a clean finish. With some finishing touches, your shiplap wall will shine. Discover more detailed steps to perfect your project.

Tools and Materials Needed

Before you plunge into your shiplap wall project, it’s vital to gather the right tools and materials.

First, you’ll need shiplap materials, which can be wood planks or engineered options. Choose a finish that complements your style.

For important tools, grab a miter saw for precise cuts, a level to guarantee straight lines, and a nail gun for easy installation. A measuring tape is essential for accurate measurements, while a stud finder helps locate the best spots to nail your shiplap.

Don’t forget safety gear like goggles and gloves.

With these items in hand, you’ll be well-prepared to tackle your shiplap wall and achieve a stunning finish that transforms your space.

Happy building!

Preparing Your Wall

As you get ready to install your shiplap wall, it’s crucial to prepare the surface properly to guarantee a smooth and successful application.

Start with wall preparation by removing any existing décor, nails, or fixtures. Next, inspect the wall for any damage or imperfections; patch holes and sand rough areas to create a level surface.

Once the wall is prepped, focus on surface cleaning. Use a damp cloth to wipe away dust, dirt, or grease, ensuring nothing interferes with the adhesive or paint. If your wall has a glossy finish, consider lightly sanding it to promote better adhesion.

After these steps, your wall will be primed and ready for the shiplap installation, setting the stage for a beautiful transformation.

Measuring and Marking

Before you start installing your shiplap, you need to gather your measuring tools, like a tape measure and level.

Next, determine the dimensions of your wall to guarantee you have enough material.

Finally, mark level lines where your shiplap will go to keep everything straight and looking great.

Gather Necessary Tools

To successfully install a shiplap wall, you’ll need to gather a few essential measuring and marking tools.

Start with a tape measure to accurately gauge your wall dimensions and the length of your shiplap boards. A level is vital to guarantee your lines are straight, while a square helps you create clean, right angles.

Don’t forget a pencil for marking measurements on the wall and the boards. If you’re exploring different shiplap styles for your project, consider having a chalk line handy for clear, visible guidelines.

This way, you’ll have a solid foundation for your design inspiration. With the right tools in hand, you’ll set yourself up for a successful installation process.

Determine Wall Dimensions

Accurately measuring your wall dimensions is essential for a successful shiplap installation. Start by determining the total wall space you want to cover.

Use a tape measure to find the height and width of the area, noting any obstacles like windows or outlets that might affect your design considerations. It’s important to measure at multiple points to guarantee accuracy, as walls can sometimes be uneven.

Record your measurements clearly, as this will guide your material purchases and installation process. By understanding your wall dimensions, you can better visualize how the shiplap will fit into your space and make adjustments to your design if necessary.

Taking these steps now will save you time and effort later on.

Mark Level Lines

Once you’ve measured your wall dimensions, the next step is to mark level lines to guide your shiplap installation.

Start by using a level tool, like a laser level or a traditional spirit level, to guarantee accuracy. Choose a starting point, typically the floor or a reference line, and mark it.

Then, hold your level tool vertically and draw a straight line across the wall. This line will help with wall alignment as you install each shiplap board.

Continue marking lines at the height you want each row of shiplap to sit. Don’t rush; double-check your lines for accuracy.

Properly marked level lines will make your installation smoother and result in a professional-looking finish.

Cutting the Shiplap Boards

As you prepare to cut your shiplap boards, it’s essential to measure carefully to guarantee a perfect fit. Start by determining the board measurements based on your wall dimensions. Use a tape measure to get accurate lengths, and don’t forget to account for any outlets or obstacles.

When it comes to cutting techniques, a miter saw or circular saw will provide clean, straight cuts. Mark your measurements on the boards clearly, and use a square to make sure your lines are straight.

Always remember to wear safety goggles and follow proper safety protocols during cutting. After cutting, double-check your pieces against the wall before installation to make sure everything aligns perfectly.

Happy cutting!

Painting or Staining the Shiplap

Now that your shiplap boards are cut and ready, it’s time to think about how you want to finish them.

Choosing the right paint or stain can enhance the beauty of your wood, while proper prep and application techniques will guarantee a smooth and lasting result.

Let’s explore how to get your shiplap looking its best!

Choosing the Right Finish

When you’re ready to enhance your shiplap wall, deciding between paint and stain can be pivotal. Each option offers distinct benefits that align with various shiplap styles.

Paint provides a solid, uniform color and is great for achieving a bold look. It also offers a wider range of colors and finishes.

On the other hand, stain preserves the wood’s natural texture and grain, providing a more rustic appearance that enhances the shiplap’s character.

Consider your overall design vision and how each finish option complements your space. If you prefer a contemporary feel, paint might be your best bet. If you’re aiming for a cozy, farmhouse look, staining could be the way to go.

Choose wisely!

Prepping the Shiplap Surface

Properly prepping your shiplap surface is essential for achieving a smooth and long-lasting finish, whether you choose to paint or stain.

Start by selecting the right shiplap material types, such as pine, plywood, or MDF, as each requires different preparation techniques. Clear any dirt or dust from the surface using a damp cloth, and allow it to dry thoroughly.

If your shiplap is raw wood, lightly sand any rough spots to guarantee an even texture. For painted finishes, consider applying a primer to enhance adhesion and color vibrancy.

If you’re staining, use a wood conditioner to promote an even finish. Following these surface preparation techniques will set you up for success with your chosen finish.

Application Techniques Explained

Applying paint or stain to your shiplap can transform the look of your space, and getting the technique right is essential for a professional finish.

Start by choosing your desired shiplap styles; whether you go with a classic white, bold color, or natural wood stain, each requires different application techniques. If painting, use a high-quality brush or roller for an even coat, ensuring you cover any gaps.

For staining, apply with a clean cloth or brush, wiping off excess for a smooth finish. Always work in sections, and allow adequate drying time between coats.

Finally, seal your shiplap with a protective topcoat to enhance durability and maintain that fresh look for years to come.

Installing the First Board

Starting your shiplap wall installation with the first board sets the tone for the entire project, so it’s crucial to get it right.

Begin by determining your desired starting height; a good rule is about one inch above the baseboard. Verify the first board placement is level by using a level tool. If your wall isn’t perfectly straight, you may need to trim the board’s edge to fit.

Once you’ve found the right spot, mark where the top of the board will go to maintain board alignment. This will serve as your guide for the rest of the installation.

Take your time here; a well-placed first board will make the subsequent boards easier to install and align correctly.

Securing the Remaining Boards

Once you’ve secured the first board, it’s time to fasten the remaining boards to create a seamless look.

Begin by ensuring proper board alignment; this is essential for a professional finish. Place the next board against the first, checking that it’s level. Use a stud finder to locate the wall studs, as they’ll provide the best support.

You can choose different securing methods, like using finishing nails or adhesive, depending on your preference. If you’re using nails, drive them into the studs at a slight angle for added stability.

Continue this process, checking alignment after each board. Keep the gaps between the boards consistent for that classic shiplap appearance.

Happy installing!

Filling Gaps and Nail Holes

After securing your boards, you’ll likely notice some gaps and nail holes that need attention. Don’t worry; gap filling and nail hole repair are straightforward steps.

For gaps between boards, use a wood filler or caulk that matches your shiplap’s color. Apply it carefully with a putty knife, ensuring it fills the space completely. Once it’s dry, sand the area gently for a smooth finish.

For nail holes, choose a wood filler or spackling compound. Fill each hole with a small amount using your finger or a putty knife. Allow it to dry, then sand it down until it’s flush with the surface.

This will create a clean, polished look, prepping your wall for the final touches.

Finishing Touches

With gaps and nail holes now filled, you can focus on the finishing touches that will elevate your shiplap wall.

Start by painting or staining your shiplap to enhance its natural beauty or to match your decor. Once that’s done, consider adding decorative accents, like trim or molding, to give your wall a polished look.

Next, think about incorporating wall art to create a focal point. Whether it’s framed photos, canvas prints, or a gallery wall, these elements can add personality and warmth to the space.

Finally, don’t forget about lighting; strategically placed sconces or a statement pendant can highlight your new wall beautifully.

Enjoy the transformation and let your creativity shine!

Maintenance Tips for Your Shiplap Wall

To keep your shiplap wall looking its best, regular maintenance is key.

Start by using gentle cleaning techniques, like a damp cloth or a soft sponge, to wipe away dust and grime. Avoid harsh chemicals that could damage the wood finish.

If you notice any scratches or dents, don’t worry! For repair advice, simply sand down the affected area and touch it up with matching paint or stain.

Additionally, check for signs of moisture or mold, especially in humid areas. If you spot any, address it immediately to prevent further damage.

Categories
Uncategorized

Is a DIY Kitchen Reface Worth It? Refinishing vs. Replacing Cabinets

A DIY kitchen reface can be worth it if you’re looking to save money and want creative control over the design. It’s quicker and less expensive than a full remodel, letting you refresh your space with new cabinet doors and finishes. However, consider the time and skill required for a professional finish, as well as any existing damage. If you’re unsure whether to reface or replace, there’s more to explore about your options.

Understanding Kitchen Refacing

When you consider giving your kitchen a fresh look, understanding kitchen refacing is essential. This process involves replacing the cabinet doors and drawer fronts while keeping the existing frames. It’s a great way to enhance kitchen aesthetics without a full remodel.

Start with a cost analysis to see if it fits your budget. Look into material selection carefully; the right materials can greatly impact durability and appearance.

Also, factor in the time investment—refacing can often be completed in days rather than weeks. Stay updated on design trends, as they can inspire your choices and make your kitchen feel modern.

The Benefits of a DIY Kitchen Reface

Choosing to DIY your kitchen reface not only saves money but also gives you complete control over the design process. You can explore budget friendly options that suit your financial needs while creating a space that reflects your personal style.

With design versatility, you’re free to mix and match colors and finishes that mightn’t be available in pre-made products. Plus, you can utilize time saving techniques to streamline your work, completing the project more efficiently.

By opting for eco friendly materials, you’ll contribute to a sustainable environment.

Finally, engaging in a DIY project offers skill development benefits, enhancing your handyman abilities and boosting your confidence for future home improvements. This journey is as rewarding as the finished kitchen!

The Drawbacks of Refinishing Cabinets

While refinishing cabinets can transform your kitchen, it’s important to contemplate the drawbacks that come with the process.

First, consider the cost considerations; materials, tools, and supplies can add up quickly. You’ll also face a significant time investment, as prepping, painting, and drying can take days or even weeks.

If you’re not confident in your skills, the skill level required for a professional-looking finish might deter you. Additionally, the durability of the finish can be a concern; if not done correctly, it may chip or wear off over time.

Finally, potential complications like dealing with existing damage or uneven surfaces can arise, turning your DIY project into a frustrating experience.

Weigh these factors before diving in.

When to Consider Cabinet Replacement

If your cabinets show signs of severe wear or damage, it might be time to contemplate a full replacement instead of a simple refresh.

Consider your current cabinet style and whether it still fits your kitchen layout; outdated designs can detract from your space.

Budget considerations are essential, as replacement can be more expensive upfront but may offer long-term value.

If your cabinets are made from low-quality materials that don’t hold up, exploring better material options could enhance both durability and aesthetics.

Additionally, if you’re planning a significant kitchen renovation, replacing cabinets can create a cohesive look that ties everything together.

Ultimately, weigh the costs against the benefits to determine if replacement is the right choice for you.

The Advantages of Replacing Cabinets

Replacing cabinets can greatly enhance your kitchen’s functionality and aesthetic appeal.

You’ll enjoy design flexibility, allowing you to tailor your space to your specific tastes and needs. With a variety of material options available, you can choose cabinets that fit both your style and budget.

While cost considerations are important, investing in quality cabinets can lead to significant long-term value. A professional installation process guarantees that your new cabinets are securely fitted, minimizing future maintenance issues.

This means you can focus on enjoying your revamped kitchen rather than worrying about repairs. Ultimately, replacing cabinets can transform your kitchen into a more efficient and beautiful space, making it a worthwhile investment for your home.

The Disadvantages of Full Cabinet Replacement

Though upgrading your kitchen with new cabinets can be enticing, full cabinet replacement comes with several drawbacks that shouldn’t be overlooked.

First, the cost implications can be significant; you may find yourself spending more than you initially planned.

Additionally, the time investment required for removal and installation can disrupt your daily routine for weeks.

There’s also the environmental impact to evaluate, as disposing of old cabinets contributes to landfill waste.

You might encounter design limitations, especially if the new cabinets don’t match your existing kitchen layout or style.

Finally, installation challenges can arise, from ensuring proper alignment to dealing with unexpected structural issues, making the entire process more complicated than you anticipated.

Making the Right Choice for Your Kitchen

When considering a kitchen update, choosing the right approach can greatly impact both functionality and aesthetics.

First, think about your kitchen style. Do you want a modern look, or are you drawn to something more traditional?

Next, evaluate budget considerations; refinishing is often less expensive than a full replacement.

Consider your project timeline as well; DIY options may take longer, but they can save you money.

Assess your skill level—are you comfortable tackling a DIY project, or would you prefer professional help?

Finally, explore material options. High-quality finishes can elevate your kitchen’s appeal without the need for new cabinets.

Weigh these factors carefully to guarantee you make the best decision for your space.

Frequently Asked Questions

How Long Does a DIY Kitchen Reface Typically Take?

A DIY kitchen reface typically takes one to two weekends, depending on your time management and skill assessment. Effective project planning and choosing your finish options can streamline the process, while design inspiration keeps you motivated.

What Tools Are Needed for a DIY Kitchen Reface?

For a DIY kitchen reface, you’ll need sanding tools, adhesive options, paint sprayers, safety equipment, and measuring devices. Gather these essentials to guarantee a smooth and efficient refinishing process for your cabinets.

Can I Reface Cabinets Without Professional Help?

Yes, you can reface cabinets without professional help. Use DIY techniques, explore different cabinet styles, apply refinishing tips, manage your time wisely, and consider cost factors to guarantee a successful project that transforms your kitchen beautifully.

What Materials Are Best for DIY Cabinet Refinishing?

For DIY cabinet refinishing, use high-quality paint types like latex or chalk, choose wood veneers for a fresh look, select suitable primer options, and explore various finish selections and strong adhesive choices to guarantee durability.

Is There a Cost Difference Between Refinishing and Repainting Cabinets?

A quality paint job can cost 30% less than refinishing cabinets, but consider long-term value. The cost comparison hinges on paint quality, labor costs, and material choices, impacting your kitchen’s overall appeal and durability.

Categories
Uncategorized

How to Install Vinyl Plank Flooring

How to Install Vinyl Plank Flooring: Everything You Need to Know Before You Start

To install vinyl plank flooring, start by choosing durable, water-resistant planks that match your decor. Gather tools like a utility knife, measuring tape, and spacers, and prepare the area by clearing furniture and ensuring a clean, level subfloor. Follow a step-by-step installation process, deciding on a floating or glue-down method. Finally, maintain your floors with regular cleaning. For additional tips and common troubleshooting techniques, you’ll find plenty of valuable information ahead.

Choosing the Right Vinyl Plank Flooring

When you’re choosing the right vinyl plank flooring, what should you consider to confirm it meets your needs?

First, think about the vinyl plank benefits, like durability and water resistance, making it ideal for high-traffic areas or spaces prone to moisture.

Next, explore various flooring styles. Whether you prefer the classic look of hardwood or a modern tile design, there’s a vinyl option that fits your aesthetic.

Check the thickness and wear layer, as thicker planks often provide better sound insulation and longevity.

Additionally, consider the installation method—click-lock or glue-down—based on your DIY skills.

Finally, verify the colors and textures complement your existing decor, creating a cohesive look throughout your home.

Essential Tools and Materials for Installation

Selecting the right vinyl plank flooring sets the stage for a successful installation, but having the proper tools and materials on hand is just as important.

Start with a utility knife for cutting planks, a measuring tape for accuracy, and a square for straight cuts. You’ll also need spacers to maintain expansion gaps and a tapping block to fit the planks snugly. A pull bar helps in tight spots, while a rubber mallet guarantees you don’t damage the edges.

For installation techniques, consider using an underlayment for added comfort and sound insulation. Finally, gather adhesive if you’re opting for glue-down installation.

With the right material selection and tools, you’ll streamline the entire process, making your flooring project much easier.

Preparing Your Space for Installation

Before you start installing your vinyl plank flooring, make certain to clear the area of all furniture and obstacles.

Next, check the condition of your subfloor to guarantee it’s clean, dry, and level.

Finally, gather all necessary tools to streamline your installation process.

Clear the Area

To successfully install vinyl plank flooring, you need to clear the area where you’ll be working. Start by removing all furniture, rugs, and other items from the space. This allows you to have ample room to maneuver and guarantees a safe working environment.

Use cleaning tips like vacuuming or sweeping to remove dust and debris from the floor. If there are any adhesive residues or stains, consider using a suitable cleaner to tackle those issues.

After cleaning, think about space organization; place your tools and materials nearby for easy access during installation. This preparation not only streamlines your workflow but also helps prevent accidents, making your vinyl plank flooring project much more efficient.

Check Subfloor Condition

Since the success of your vinyl plank flooring installation hinges on a solid foundation, it’s vital to check the condition of your subfloor before proceeding.

Start by identifying the subfloor types in your space, whether it’s concrete, plywood, or OSB. Each type has specific requirements for installation.

Next, assess the subfloor moisture; a moisture meter can help you determine if levels are acceptable. Ideally, moisture content should be below 5%. If you find excessive moisture, address the source before continuing.

Also, inspect for any damage like cracks or uneven areas. Repairing these issues guarantees a smooth and lasting installation.

Taking the time to evaluate your subfloor now will save you headaches down the line.

Gather Necessary Tools

With your subfloor in good condition, it’s time to gather the necessary tools for your vinyl plank flooring installation.

Start with essential items like a utility knife, measuring tape, straight edge, and a tapping block. You’ll also need spacers, a rubber mallet, and a pull bar to guarantee a tight fit.

Prioritize tool selection based on your specific flooring type and layout. Don’t forget protective gear like knee pads and safety glasses.

Before you begin, check each tool for proper function; tool maintenance can prevent delays and guarantee quality results.

Step-by-Step Installation Process

Now that your space is prepared, it’s time to focus on the step-by-step installation process.

Start by ensuring your subfloor is clean and level, as this will set the foundation for your planks.

After that, you’ll employ specific installation techniques and finish off with trims for a polished look.

Preparing the Subfloor

Preparing your subfloor is an essential step in the vinyl plank flooring installation process. First, identify the subfloor type—whether it’s concrete, plywood, or OSB—as this will dictate your preparation approach.

Verify the surface is clean, dry, and free of debris. For concrete subfloors, check for moisture levels; a moisture barrier may be necessary for control.

For plywood or OSB, repair any damaged sections, and sand down rough areas to create a smooth surface. If your subfloor is uneven, consider using a leveling compound.

Finally, let everything dry thoroughly before proceeding. Proper preparation not only enhances the appearance of your new flooring but also guarantees its longevity and performance.

Take the time to get this right!

Plank Installation Techniques

As you plunge into the installation of your vinyl plank flooring, start by laying out all your materials and tools to streamline the process.

Decide between the two main installation techniques: floating installation or glue down. For floating installation, begin by placing the first plank in the corner, ensuring it’s aligned with the wall. Continue laying planks end to end, using spacers for expansion gaps.

If you opt for the glue down method, apply adhesive evenly to the subfloor, then firmly press each plank into place, ensuring a tight fit.

Regardless of the method, stagger your seams for a natural look. Keep checking your alignment and make adjustments as needed for a professional finish.

Finishing Touches and Trims

Once you’ve successfully laid the planks, the finishing touches and trims are essential for achieving a polished look.

Start with baseboard installation; remove old baseboards if needed and measure new ones to fit snugly against the wall and flooring. Cut them to length, then secure them with finishing nails.

Next, install transition strips where your vinyl plank meets other flooring types. Cut the strips to size and attach them firmly, guaranteeing a smooth shift that prevents tripping hazards.

Make sure all gaps between the flooring and walls or other surfaces are filled for a clean finish.

Finally, inspect your work to verify everything’s aligned, and your new floor looks professional and inviting.

Tips for Maintaining Your Vinyl Plank Flooring

While vinyl plank flooring is known for its durability and low maintenance, keeping it in top shape requires some attention to detail.

Establish regular cleaning routines to prevent dirt and grime buildup. Use a soft broom or vacuum designed for hard surfaces to remove debris, followed by a damp mop with a manufacturer-recommended cleaner. Avoid harsh chemicals, as they can damage the surface.

For damage prevention, place mats at entryways to catch dirt and moisture, and use furniture pads under heavy items to prevent scratches. Additionally, avoid dragging furniture across the floor.

Troubleshooting Common Installation Issues

When you encounter issues during the installation of vinyl plank flooring, addressing them promptly can save you time and frustration.

One common mistake isn’t acclimating the planks to the room temperature, which can lead to expansion or contraction. To avoid this, let the planks sit in the room for at least 48 hours before installation.

If you notice gaps between the planks, check that the subfloor is level; uneven surfaces can cause this issue.

Additionally, if the planks aren’t locking together properly, verify you’re lining them up correctly and tapping them gently with a rubber mallet.

Following these troubleshooting tips can help you resolve problems quickly and achieve a smooth, professional-looking finish.

Categories
Uncategorized

DIY Home Improvements – Easy Weekend Projects For Every Skill Level


Do you have a weekend free and an itch to create something beautiful without committing to a month-long renovation nightmare? We all look for that perfect blend of high-impact change and low-commitment labor. That’s why we’ve compiled a list of Easy Weekend Projects For Every Skill Level, guaranteeing you can see a noticeable transformation in your home by Sunday evening. Whether you’re a complete novice looking to wield a screwdriver for the first time or a seasoned DIYer seeking a quick win, these budget-friendly and time-conscious tasks will boost your home’s aesthetic and functionality without derailing your entire schedule.

You can transform your home without a massive time commitment or extensive experience. With a variety of easy weekend projects designed for every skill level, you’ll find tasks that not only enhance your space but also boost your confidence. Whether you’re a complete novice or a seasoned DIYer, there’s something here for you to tackle. Explore practical improvements that can be completed in a weekend, making your home more functional and aesthetically pleasing.

Assessing Your Skills

Before exploring into DIY projects, it’s vital to evaluate your skill level honestly. Consider your past experiences, comfort with various tools, and familiarity with different materials. This self-assessment will help you choose projects that match your abilities and ensure a more enjoyable and productive weekend. Having a clear understanding of your skills will also aid in avoiding frustration and potential hazards.

Beginner-Friendly Projects

If you’re new to DIY, start small with tasks that require minimal tools and experience. Simple projects like painting a room, assembling furniture, or installing shelves can provide a sense of accomplishment without overwhelming you. These tasks allow you to build confidence while honing your skills.

Intermediate Challenges

Once you’re comfortable with beginner tasks, you can tackle intermediate challenges, such as refinishing furniture, tiling a backsplash, or installing a new faucet. These projects generally require more tools and techniques, including measuring, cutting, and some basic plumbing or electrical knowledge. With these skills, your DIY repertoire expands significantly.

Intermediate projects are perfect for those looking to elevate their DIY game. Refinishing a wood table, for example, revitalizes furniture with minimal cost. Tiling a backsplash not only updates your kitchen but also enhances your design skills. Engaging in these challenges pushes your boundaries, allowing for learning and growth with satisfying results.

Advanced Renovations

For seasoned DIYers, advanced renovations can include significant alterations like remodeling a bathroom or updating outdoor spaces. These projects often involve construction skills, design planning, and a solid understanding of plumbing or electrical systems. They require careful planning and a significant time investment but can dramatically transform your living space.

  1. Kitchen remodels
  2. Bathroom renovations
  3. Outdoor deck builds
  4. Full home painting
  5. Installing new flooring
Project Type Skills Required
Bathroom remodel Plumbing, tiling, electrical
Kitchen upgrade Cabinet installation, countertop fitting
Outdoor renovation Structural design, landscaping

Advanced renovations can significantly impact your home value and require a more detailed approach. Remodeling spaces like kitchens and bathrooms can be complex, involving many facets such as plumbing and electrical work that need careful consideration. Planning and budgeting are key, ensuring that you have all necessary materials and tools ready before starting. This type of project not only enhances your skill set but ultimately brings significant satisfaction and joy to your living environment.

  1. Assess what changes you want to make
  2. Create a budget for materials and tools
  3. Obtain necessary permits if required
  4. Visualize the finished product before starting
  5. Have a timeline for completion
Plan Steps Considerations
Budgeting Material and labor costs
Timeline Realistic completion estimates
Permits Local regulations

Essential Tools for DIY Success

Must-Have Tools

To kick off your DIY journey, equip yourself with a few imperative tools. A cordless drill, for example, opens up a world of possibilities, allowing you to tackle anything from hanging shelves to assembling furniture. A good set of screwdrivers, pliers, and a tape measure are indispensable for any project, while a level ensures everything you build is perfectly straight. For those who are more adventurous, a miter saw can simplify cutting angles for trim work or furniture. Investing in quality tools not only enhances performance but also makes your projects more enjoyable.

Safety Gear

Don’t overlook safety gear when venturing into DIY projects. A pair of safety goggles is imperative for protecting your eyes from dust and debris, especially when sanding or drilling. Ear protection should also be a priority when working with loud tools like saws or drills. Additionally, a sturdy pair of work gloves can safeguard your hands from cuts and blisters, giving you added confidence as you work on your home improvements. Prioritizing safety ensures you can complete your projects without unnecessary risks.

Planning Your Weekend Projects

Planning is key to executing successful DIY home improvements. Begin by identifying which areas of your home need attention and prioritize projects based on urgency and impact. Consider factors like your schedule, budget, and availability of tools and materials. A little forethought can streamline the process and maximize your enjoyment of the weekend work ahead.

Setting Realistic Goals

Assess what you can realistically achieve in a weekend. Break larger projects into smaller, manageable tasks that fit your skill level and time constraints. This approach not only reduces frustration but also allows you to appreciate your progress. Focus on accomplishing a few tasks thoroughly rather than overwhelming yourself with too many projects.

Creating a Timeline

Developing a timeline helps you structure your weekend DIY projects effectively. List each task sequentially, and estimate the time required for each one. For example, if you’re painting a room, allocate time for preparation, painting, and cleanup. A well-defined timeline keeps you organized and provides a roadmap for your weekend, ensuring each segment is approached without rushing.

When creating your timeline, factor in potential challenges such as drying times for paint or unexpected repairs. It’s wise to set aside buffer time to accommodate any disruptions that may arise. Organizing your weekend into specific time blocks can also help you maintain focus and momentum, pushing you closer to completing your goals while enjoying the process.

Popular DIY Projects

Focusing on popular DIY projects can help you choose tasks that not only enhance your home’s appeal but also match your skill level. From refreshing your interiors to sprucing up your outdoor space, these projects can be completed over a weekend and provide satisfying results. Let’s explore some options that offer both ease and impact.

Painting and Wallpapering

Painting and wallpapering are among the quickest ways to transform a room’s ambiance. You can choose a fresh coat of paint or a bold wallpaper pattern to reflect your style. Techniques like using painter’s tape for clean edges and applying multiple coats strategically can yield professional results without the cost.

Landscaping and Gardening

Enhancing your outdoor space through landscaping and gardening can add beauty and value to your property. Simple tasks like planting seasonal flowers, mulching, or creating a small herb garden can significantly improve aesthetics while allowing you to enjoy nature more fully.

When tackling landscaping, start with a plan that considers both design and maintenance. You can create raised beds for easy access and better drainage, or use native plants that require less water and care. Incorporating pathways with stones or mulch can also delineate areas, making your garden feel more organized and visually appealing.

Upcycling Furniture

Upcycling furniture gives old pieces a new life while saving money and reducing waste. Whether it’s refinishing a wooden chair or painting a worn-out dresser, you can often achieve remarkable results with minimal investment. Simple techniques such as distressing or applying new hardware can make a world of difference.

Consider furniture that complements your style for upcycling projects. For instance, transforming a vintage table with chalk paint can modernize its look. Additionally, adding stencils or decoupage techniques can customize the piece to fit your home’s decor. The result is not just a functional item, but a conversation starter that adds character to your space.

Simple Repairs and Maintenance

Simple repairs and maintenance tasks are vital for keeping your home in good condition. Tasks such as fixing leaky faucets, patching drywall, or tightening cabinet handles can be easily managed over a weekend. Completing these projects helps ensure your space remains functional and comfortable.

Regular maintenance activities, such as cleaning gutters or checking for drafts, can prevent more extensive issues down the line. You can tackle these jobs with straightforward materials, like caulk for sealing gaps or vinegar for cleaning. Committing a few hours to these tasks not only improves your home’s performance but also extends the lifespan of your fixtures and finishes.

Safety Tips for DIY Enthusiasts

Protecting Yourself

Prioritize your safety by using the right gear and understanding your tools. Wearing safety glasses protects your eyes from dust and debris, while gloves prevent cuts and abrasions. If you’re working with power tools, make sure to have hearing protection to guard against long-term damage. Understanding the functions of your tools is imperative; always read the manual, especially for unfamiliar devices. If you’re working outdoors, be aware of your surroundings and avoid electrical hazards. The most experienced DIYers still follow these vital safety practices.

  • Use safety goggles to shield your eyes.
  • Wear gloves to prevent injuries.
  • Read user manuals for unfamiliar tools.
  • Ensure your workspace is well-lit and clutter-free.
  • Have a first aid kit on hand for emergencies.

Budgeting for Home Improvements

Understanding Costs

Start by itemizing all potential expenses, including materials, tools, and any hired help. For instance, a simple kitchen backsplash can run from $300 to $1,000 depending on the tile selected. Research local prices online and adjust your budget accordingly. You might find comparable tile options at discount retailers that fit your budget better.

Prioritizing Projects

Identify which projects will provide the best return on investment. Projects like adding energy-efficient windows or landscaping can significantly boost your home’s value. Allocate more funds to these areas while scaling back on less impactful tasks.

Creating a Contingency Fund

Set aside 10-20% of your total budget for unexpected costs that may arise during the renovation process. This might cover additional supplies or repairs that you didn’t anticipate, ensuring your project stays on track financially.

Conclusion

Whether you tackle a fresh coat of paint on a piece of furniture, install floating shelves for extra storage, or upgrade your outdated lighting fixtures, these Easy Weekend Projects For Every Skill Level prove that big results don’t require big time investments. The real joy of these tasks is the quick gratification and the confidence boost they provide for tackling larger projects down the road. Gather your tools, pick one idea, and enjoy the satisfaction of completing a high-impact home improvement project before your Monday morning alarm clock rings!

Presently, DIY home improvements provide an accessible way for you to enhance your living space over the weekend, regardless of your skill level. By selecting projects that align with your abilities and interests, you can achieve satisfying results that elevate both your home’s value and your personal satisfaction. These weekend endeavors not only allow you to express creativity but also improve your confidence in tackling home repairs and upgrades. Embrace the opportunity to transform your home and enjoy the rewards that come with your hard work.